Finding the “optimal stride” is important for hockey players at all levels. It helps ensure they’re maximizing their range of motion and power, and not compromising skating efficiency. Because this is such an important topic, I’ve written several articles in the past on frequently overlooked factors that dictate what may be optimal for any given individual. You can read a few of those at the links below, but I’d encourage you to do a quick search on the site for “stride length” if you’re interested in reading more on the topic.

  1. 3 Keys to Developing Optimal Skating Technique
  2. Limitations to Optimal Skating Performance
  3. Breakaway Hockey Speed Q&A

Assuming the player does in fact have the requisite bony structure and strength capacity to sustain a low position while skating, the two keys to retraining a player to maintain a deeper skating depth are to:

  1. Remove soft-tissue limitations to deeper skating depths
  2. Practice skating specific patterns in a deeper stance

I suspect, in comparison to some of the topics referenced in previous articles, these are two training components that many people in the hockey world are familiar with, and are probably the two that people gravitate towards. That said, I think there are different ways to approach this than simple groin stretches and continually cuing players to skate lower or bend their knees more.

When our players come back to us at Endeavor, two extremely common limitations I continue to notice are generalized stiffness in the posterior hip (posterior hip capsule, hip external rotators and glute max), and poor relative motion between the medial hamstrings and the posterior adductor magnus. Both of these can limit depth on the stance leg by interfering with smooth hip flexion, as well as causing some problems on the stride leg.

 Posterior Hip Musculature

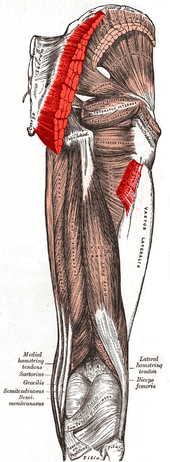
An image of the posterior hip (from wikipedia.com) with the glute max cut, illustrating many of the underlying structures than tend to become stiff in hockey players.

Hip Musculature

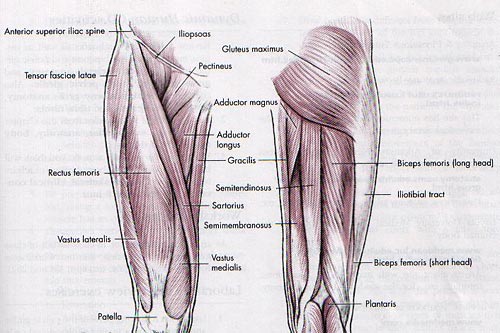
An image of the hip and thigh musculature (from T-Nation.com). Note the adductor magnus on the inside of the image on the right, and it’s proximity to the two medial hamstrings: semitendinosus and semimembranosus.

While addressing posterior hip capsule stiffness could be an entire post in itself, I’ve found that restoring relative motion between the posterior adductor magnus and medial hamstrings is fairly easily accomplished with some basic Active Release work. Of course, not everyone will have access to an A.R.T. provider, so it’s helpful to have some ways to troubleshoot this on your own. I’ve found that players respond pretty well to “treating” this area themselves with a lacrosse ball placed on top of a box/table (preferably a hard surface). Instead of just rolling around, I encourage players to take a more “seek and relax” strategy, slowly rolling to find sensitive/dense areas, and then just slowly let their leg sink deeper onto the ball as they try to relax and let the tension dissipate. Once they’ve been able to ease some of the tension, I’ll instruct them to slowly straighten their knee, which will slide the hamstrings past the posterior adductor and help restore some relative motion between the structures.

Self-Myofascial Release for Posterior Adductor

You can then follow that up with some self-mobilizations to help reinforce hip adduction range of motion through a large arc. This is one we use fairly frequently. You can modify this slightly by turning the extended leg so that the toes point more toward the ceiling.

Lateral Kneeling Adductor Mobilization

As you may suspect, improving hip mobility takes a multi-faceted approach and there are dozens of “self-myofascial release”, mobility, and stretching exercises than can be used to accomplish this. The examples above are simply two powerful ones that many people may not be aware of.

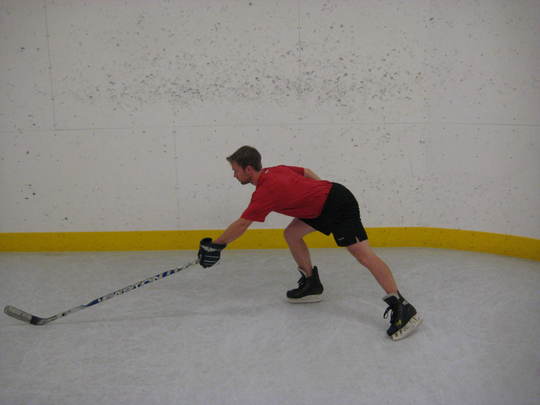
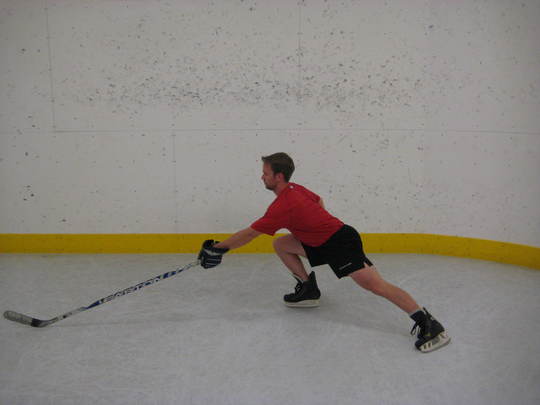
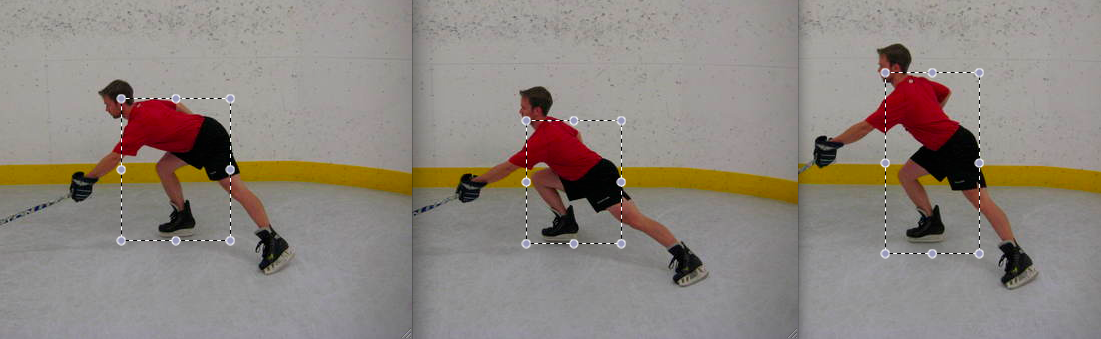
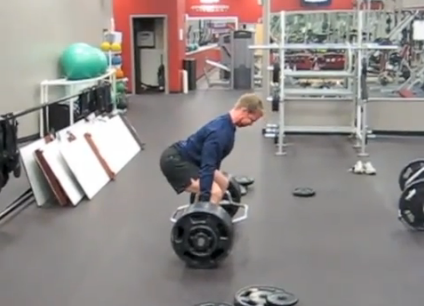
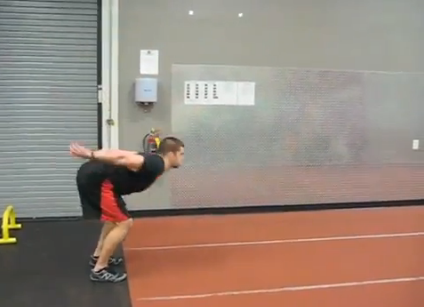
Once you’ve established adequate range of motion, the next stage is to reinforce a lower skating position. This is best accomplished on the ice and can also be reinforced on a slideboard, but I’ve also gotten a lot of mileage out of an exercise I call the “2-Way Skater”. While skating naturally requires a propulsive action from the stride leg, skating depth (and therefore stride length) is largely influenced by the position of the stance leg. Also, the ability to transfer the force from the stride leg through the stance leg is dependent upon stance leg stability. For these reasons, the 2-Way Skater is an outstanding exercise to reinforce optimal skating depth, stance leg stability, and full stride leg extension. Check out the video I filmed for HockeySC.com several months ago that dives into how to perform the 2-Way Skater and what we’re looking for with the exercise:

Dissecting the 2-Way Skater

This is a simple 3-step off-ice approach to improving stride length in hockey players:

  1. Remove the soft-tissue restriction
  2. Mobilize the joint in a movement specific pattern
  3. Reinforce proper depth with a movement specific exercise

If you’re a young player that needs to work on maintaining a deeper skating depth, I’d encourage you to try these things, as well as follow a comprehensive training program as outlined in Ultimate Hockey Training. As always, please feel free to post your comments below!

To your success,

Kevin Neeld
UltimateHockeyTraining.com

Please enter your first name and email below to sign up for my FREE Athletic Development and Hockey Training Newsletter!

I was recently very humbled to be asked to be the “Featured Interview” for the Postural Restoration Institute (PRI).

Postural Restoration Institute

As you likely know, I’ve been heavily influenced by the lens through which PRI views structure and function, and their courses have had a fairly profound impact on the way we assess and train our athletes at Endeavor. I like to think our philosophies and methodologies have also had an impact on them, as we now have evidence of PRI’s support for heavy lifting!

Jen Poulin Deadlifting

Instructor Jen Poulin preparing to pull 5 wheels after a long day of teaching at Endeavor

While the interview certainly has a PRI undertone, it also dives into several things I think you’ll really enjoy, including:

  1. My vision for Endeavor Sports Performance, and ultimately, what I strongly believe is the best approach to preparing athletes
  2. Exactly what we’re doing with our off-season hockey players at Endeavor this Summer
  3. A few ways we have and are integrating PRI concepts into our programs
  4. My short list of go-to rehabilitation specialists in our area
  5. A list of my mentors, which (not coincidentally) are also the top people I recommend young S&C professionals pursue internships with
  6. My thoughts on the Postural Restoration Trained credentialing process

Check out all of this and more here >> PRI’s Featured Interview with Kevin Neeld

To your success,

Kevin Neeld
UltimateHockeyTraining.com

Please enter your first name and email below to sign up for my FREE Athletic Development and Hockey Training Newsletter!

Slideboards have become an integral piece of equipment in our training programs at Endeavor. I’m sure I could design programs without them, but I’m glad that I don’t have to. For those of you that have read Ultimate Hockey Training, you’ll notice that we use slideboard for a lot more than simply slideboarding. Slideboards work their way into a lot of our exercise progressions and can be used for things like posterior chain, medial hip, upper body pressing, and core work.


Over the last week I’ve gotten a few emails asking about what lengths we use and if it’s necessary to get an adjustable board, so I thought I’d address that question today. At Endeavor we have 10′ UltraSlide Slideboards, which we bought (like all of our equipment) from Perform Better.

If you’re using the slideboard for all the auxiliary exercises like lateral slideboard squat, slideboard body saws, slideboard hamstring curls, etc., it really doesn’t matter what size board you have. All that matters is that it slides. You can also do these exercises on turf or carpet with Val Slides or furniture movers. If however, you want to slideboard on them, then the 10′ adjustable boards can make a huge difference in the way you’re able to program slideboard work.

Slideboarding
Hip-Resisted Slideboarding
Slideboard Hamstring Curl Variation
Band-Resisted Lateral Slideboard Lunge
Slideboard DB Reverse Lunge
Slideboard Push-Up w/ 1-Arm Reach
Slideboard Fly
Slideboard Army Crawl

The UltraSlide adjusts to 6.5-9.5′ in 1′ increments. For the overwhelming majority of our athletes in most conditioning protocols, we’ll use the 7.5′ setting. However, we also frequently utilize the 6.5′ and 8.5′ settings frequently. The shorter setting is beneficial for younger, weaker, or less experienced athletes that simply don’t have the gusto to make it across the board with authority on each push. For our athletes that are above ~6’2″, we slide it out to the 8.5′ setting to accommodate their longer stride length. If I had to ballpark the equivalent for the shorter setting, I’d say it’s for athletes around 5’6″ or shorter, but this is really dependent upon their strength and familiarity with the motion. Those distances for athletes at those heights tends to normalize stride frequency within a reasonable margin.


Last Summer we started putting an emphasis on either keeping a steady pace or on maximizing the reps per set. Keeping a steady, intentionally slower pace within the intervals we programmed allowed us to do a few things:

  1. Spend some time cuing the movements and reinforcing proper posture
  2. Develop the aerobic system in a sport-specific pattern
  3. Develop local muscular endurance while minimizing more global fatigue

Even more recently, we’ve started programming slideboard work with the intent of maximizing alactic power. Within this paradigm, the goal is essentially to work as hard as possible within a ~6s time frame and then recover completely. This idea can be modified slightly to train alactic capacity by not allowing complete recovery between bouts, but in both cases the goal is to work as hard as possible within the work intervals. This “work as hard as possible” descriptor is slightly different than “get as many touches as possible”, and highlights another reason why I really like having adjustable slideboards. Because the focus of these intervals is to push the rate at which energy can be produced, it’s essential that the athletes are actually doing WORK during the interval. With longer board settings, the glide phase of the movement is accentuated so the amount of work in any given time frame will be less compared to that same athlete on a shorter board. When we’re using slideboards with these training goals in mind, we’ll typically shift it one setting shorter than where we’d typically have an athlete go based on the height ranges above.

In short, I think it’s important to have adjustable slideboards, as it allows you to program more specifically to the individual in a group setting or to a growing individual (e.g. all youth hockey players). UltraSlide Slideboards aren’t cheap, running in the realm of $400-$600. I think people get too caught up in the ticket price and overlook the value. Aside from the fact that hockey parents are notorious for buying their kids new $300-$600 skates every year when their kid’s feet grow, and new $200 one-piece sticks (which are unnecessary and potentially counter productive for youth players…a rant for another day), it seems inconsistent to scoff at a $500 slideboard that, in one form or another, could get regular use year-round for a player’s entire career. When we’re making equipment purchasing decisions, I always try to keep the life of the implement in mind. For example, a $50 medicine ball that we’re going to break after 2 months is an expense of $25/month, an investment we make regularly because we value this type of training.

Med Ball Graveyward

Med Ball Graveyard

A $500 slideboard that we’re going to use daily for 20 years is ~$2/month. Viewed in this light, it’s actually a better value, and given the diversity of uses, a much better investment. If you have any slideboard-related questions, please feel free to post them below!

To your success,

Kevin Neeld
UltimateHockeyTraining.com

Please enter your first name and email below to sign up for my FREE Athletic Development and Hockey Training Newsletter!

The other day I got an email from a hockey dad that had just downloaded and started diving into Breakaway Hockey Speed, and immediately had some questions. Based on what he told me, he has two sons that have completely different skating styles (which is something I discuss in the manual), and was hoping to get some clarification on “ideal” skating patterns.

He wrote:

Kevin, I signed up for Breakaway Hockey Speed and am reading it now.It’s awesome! It rings very true to me. You don’t look like a very old guy but the observations here would seem to have taken a lot of time or some very careful observation over a number of years.

The reason it rings true to me is that I played hockey all my life and now have two boys ages 12 and 10 who have played since they were old enough to skate. And the two have totally different skating styles.

It’s been a real nature vs. nuture observation for me – they both learned the exact same way and they both did the exact same programs. But they have two very different body types (youngest one lean and flexible, the older more dense with a more limited range of motion) and that certainly seems to have been the biggest difference in their development as hockey players and skaters.

I’ve cut out parts of the message, but his questions and my responses are below:

1) How does one determine their optimal skating depth based on their individual build and joint range of motion (ROM)? Should working on improving ROM be the priority instead of adapting to a sub-optimal situation?

Skating depth based on an individual’s build goes much deeper than muscle flexibility. The contour of the hip joint itself and the length of the femurs relative to the torso will both play a huge role where a player’s optimal body position falls. Longer femurs relative to a shorter torso (this can occur in tall and short people as it’s the ratio, not the absolute lengths that’s important) will necessitate that the player maintains more of a forward torso lean to position his or her center of gravity appropriately above their skates. This will necessitate more hip flexion range of motion, which the individual may or may not have, or will result in a spinal flexion (rounding, particularly of the lower back) which is likely to cause discomfort in this area over time. Allowing this player to skate “higher” than some arbitrary “norm” isn’t allowing them to adapt to a sub-optimal situation, it’s keeping them out of sub-optimal positions altogether. I’m sure these things could all be measured, but that’s really not necessary. You just need to have a good eye for how they move.

In reality, the “ideal” stride is almost the same for everyone: it’s the lowest depth that a player can achieve keeping their hips above their knees,  maintaining a neutral spine with their center of gravity balanced appropriately over the skates. In Ultimate Hockey Training, I’ve included some pictures of extreme situations to help illustrate how “lower” is not always better.

Far Bend Stride

In this picture, the degree of hip flexion (think torso lean) is way too far. Note that I still have a fairly neutral lumbar spine (lower back) in the picture, which is desirable. However, the angle of torso lean is such that it unloads the stride leg, so it’s not possible to produce as much propulsive force off that leg.

Deep Standing Stride

In this picture, the degree of knee flexion is way too far. This shifts the COG too far behind the lead leg, but the deep bend also makes roughly the first half of the stride very awkward, as it’s essentially just repositioning behind the COG to be able to create propulsive force.

Optimal Stride

In contrast to the firs two pictures, this one is characterized by much more mid-range hip and knee flexion angles. This allows a more optimal positioning of the COG over the front skate, while also positioning the body for a strong propulsive stride. In the picture below, I’ve put the three pictures side-by-side, with a box that encompasses the shoulders and the pelvis to provide a crude illustration of where the bodies weight is positioned. Note that the first box is shifted forward, and the second box shifted backward relative to the more optimal stride position.

Skating Stride Comparison

With all of that said, the criterion for an optimal position is relatively similar for most skaters, but the outcome will be much different based on individual structural differences. As I noted above, an individual with longer femurs and a shorter torso may look a little more like the first picture in order to keep their weight positioned appropriately. An individual suffering from femoroacetabular impingement will have limited hip flexion ROM (typically around 90 degrees, compared to 120+) and will therefore need to maintain a slightly higher skating position to minimize stress to their anterior-superior hip labrum (the most common site of tears), and their anterior hip capsule. The point here is that optimal will look different for everyone, and it’s important to identify WHAT exactly may be limiting an individual’s ability to skate at a lower depth (if they appear too high, which is the most common complaint). It could be strength, positional awareness,  or structure, all of which are trainable/coachable, but they require very different strategies to address.

Femoroacetabular Impingement

2) When you say that most skaters with shorter, choppier strides are “naturally tighter”, what does this mean exactly? Is there any point in working with a skater that fits into this category to attempt to develop the flexibility and ROM necessary to have a closer to ideal knee and hip flexion?

This is an observation I’ve noticed from my time as a player and as a strength and conditioning coach. Stiffer players tend to be faster. This is true in almost all sports. They tend to be higher force output individuals, probably because the stiffness allows them to transfer energy and reduce force better. Stiffness, by definition, means it takes more force to displace the joint through any given range of motion; it doesn’t mean they can’t achieve full ROM. Although this is sometimes the case; the key is to know what they need and ensure that every player has that plus a little “wiggle room”. The idea that more flexibility is better is drastically misguided, and stiffness gets a really bad reputation when it probably shouldn’t.

3) You wrote that about 45-degrees is an optimal stride angle. I’ve noticed that for really effortless looking skaters who have green knee bend and hip flexion it sometimes seems like they are pushing almost straight out to the side at times. I know that just doesn’t sound right and I’m sure there’s no way the mechanics can work but maybe there’s a radius / arcing motion at play that makes it look that way. Just curious if you have ever studied that?

The 45-degree angle is optimal simply because of physics; think Newton’s laws. When an individual pushes through the ice, the stride leg is creating the propulsive force and the glide leg is determining the direction the individual will move, within reason. If a players stands with both skates pointing straight ahead, and pushes straight to the side with the right skate, he/she will either: A) Shave ice with their left skate or B) Fall over. This is despite the “glide leg” being oriented straight ahead. The vector that the individual pushes at will strong bias their movement in that same direction. Just as a push straight to the side would push them straight sideways, a push straight back would push them straight forward. This latter scenario would be ideal, but given the contour of the skating blade, they wouldn’t gain any friction. 45 degrees (or some slight variation of it) maximizes the combination of the forward propulsion vector AND skate blade contact.

Andy McDonald Skating

That’s a wrap for today. If you haven’t yet downloaded your copy of Breakaway Hockey Speed, you can do so for FREE by entering your name and email in the form below!

To your success,

Kevin Neeld
UltimateHockeyTraining.com

Please enter your first name and email below to sign up for my FREE Athletic Development and Hockey Training Newsletter!

I got another question via email last week about post-activation potentiation (PAP). The writer mentioned he has been familiar with the practice and has benefited from integrating it into his own programs, but hasn’t seen a lot of other coaches use it.

If you’re not familiar, PAP is phenomenon that has implications for both performance in the presence of fatigue and high power/speed contractions.  Essentially, ongoing or repeated stimulus of a neuromuscular pathway (think muscle contraction) results in any number of proposed consequences that prime that pathway for future force production. The proposed mechanisms included increased Ca2+ sensitivity of the involved actin/myosin chains and increased alpha motor neuron excitability. In both cases, the result is an increase in force production for the same “input” signal, although the former is at the muscular level and the latter is at the spinal cord/nervous system level. If you’re interested in reading deeper into this, I highly suggest reading this review article:

Hodgson, M., Docherty, D., & Robbins, D. (2005). Post-activation potentiation: underlying physiology and implications for motor performance. Sports Medicine, 35(7), 585-595.

The most common application of this principle in the strength and conditioning world is to pair a heavy resistance training exercise with a similar patterned explosive movement exercise. A few examples include:

  1. Back Squat or Front Squat paired with a Vertical Jump
  2. Deadlift or Stiff-Legged Deadlift paired with a Broad Jump
  3. Reverse Lunge or RFE Split Squat paired with a Split Squat Jump
  4. Bench Press paired with an Explosive Push-Up
  5. Chin-Up paired with an Overhead Med Ball Slam
  6. Forward Sled Drag paired with a Forward Sprint
  7. Lateral Sled Drag paired with Lateral Start Sprint

These are just a few examples, but hopefully it provides a couple illustrations as to how this principle can be applied. This type of training method is known as “Contrast Training” and has been around for a LONG time. At Endeavor, we’ve used this method in various capacities, including using resisted and unresisted jumps with the Vertimax.

I view it as a method to unlock existing power potential within the nervous system. Naturally then, it’s a method that is appropriate for use within phases that power development is a primary or secondary goal. It’s also an effective method at maintaining maximum strength levels. There are a few important considerations in how this method is implemented:

  1. The intensity of the resistance training load
  2. The volume of the resistance training exercise
  3. The pattern of both the resistance training and power training exercise
  4. The duration of rest between the two

In general, the first two components here are fairly simple. The higher the intensity, the greater the potentiation. Volume should be kept low so as to induce activation, but not fatigue. Naturally a Back Squat performed at 90% 1-RM for 3-4 reps (or whatever is the individual’s max) would not be likely to improve subsequent power performance because the individual would be too fatigued. In contrast, if the individual performed 1-RM with perfect technique and an accelerated concentric phase (moving the weight up quickly), the “prime” for explosive movement would be more optimal with less risk of creating unnecessary fatigue. This view point is largely supported by the degree of time we have in real-world training situations to implement this method. Some research suggests that waiting as long as 8-12 minutes maximizes the benefits of potentiation (Gouvea, A., et al., 2012), whereas others suggest that 4 minutes may be optimal with values returning to baseline by 8 minutes (Lowery, R., et al., 2012). The discrepancies are inevitably in the employed methods and probably reflect longer rest for higher volumes of training. Unfortunately, in most situations it’s not realistic to wait 8 minutes between exercises, so minimizing the “conditioning stimulus” resistance training exercise volume is an effective strategy to capitalize on potentiation in a reasonable time frame.

With regards to to the selected exercises, it’s important to remember that, while there is certainly some carryover, neural activation networks are movement specific. The more directly the conditioning exercise can replicate the subsequent power exercise, the more profound of an impact the potentiation will have. Essentially you want to think of it as overloading a pattern, and then unloading a pattern. In the examples above, you’ll note that a back squat is paired with a vertical jump, but a deadlift is paired with a broad jump. The primary difference between a broad jump and a vertical jump is that there is a greater forward torso lean and  posterior weight shift with a broad jump, which allows the individual to propel themselves forward more than upward. Similarly, a deadlift involves a greater posterior weight shift and more heavily loads the posterior chain compared to a back squat. These differences are slight, but notable.

Hockey Training-Trap Bar Deadlift
Trap Bar Deadlift
Hockey Training-Broad Jump
Broad Jump
Hopefully this gives you some good ideas on how and when to implement this type of strategy. As with any training method, it’s important to keep the goal in mind so you can program this method into the appropriate phase of a training cycle. This fits very well into an off-season phase where power development is the primary target. It would not fit very well in an in-season environment where the players have a substantial amount of accumulated fatigue (you can’t maximize peak power from a diminished starting point). In contrast, it may fit well into a short in-season training cycle where the players have decreased practice and game loads, are fairly rested, and need to return to some max strength and power work, briefly. I’d also urge you to only use this method with exercises that are EXTREMELY familiar to the athlete. As I’ve said repeatedly in the past, you have to move well before you can move more or move faster. The athlete should be proficient in both the resistance training and power exercises. If you’re interested in more information on PAP, Bret Contreras wrote a great article on the topic a few years ago, which you can find here: Post-Activation Potentiation: Theory and Application

To your success,

Kevin Neeld
UltimateHockeyTraining.com

References:

  1. Gouvea, A., et al. (2012). The effects of rest intervals on jumping performance: A meta-analysis on post-activation potentiation studies. Journal of Sports Science, Nov 9, epub.
  2. Lowery, R., et al. (2012). The effects of potentiating stimuli intensity under varying rest periods on vertical jump performance and power. Journal of Strength and Conditioning Research, 26(12), 3320-3325.

Please enter your first name and email below to sign up for my FREE Athletic Development and Hockey Training Newsletter!

Use CODE: "Neeld15" to save 15%