An overly bold statement?

Not in light of experimental and “in the trenches” experience.  Research has shown that adductor (groin) strains result from a strength imbalance between the hip adductors and hip abductors (or the muscles that pull the leg toward the midline vs those that pull it away from the midline).  There is also research to support a lack of core strength relative to adductor strength as a risk factor for sports hernias, which can also be a source of groin pain.  How do you avoid these issues?  

Create a balanced muscular strength and endurance profile around the hip and core. 

Adequate range of motion is a piece of the puzzle, but ensuring balanced muscular strength and endurance across the hip and core musculature is paramount to preventing groin pain.  

If you think back to the analysis we went over a couple weeks ago, you should have some information on specific muscular weaknesses and imbalances.  The training to help alleviate these problems isn’t overly complex.

Core Stability

If your athlete has insufficient front plank endurance, add 3 sets of front planks to their training.  A progression might look like:

  1. Sets: I generally keep sets constant at 3, sometimes 4.
  2. Time: Start with 3-4 sets of 20s holds.  Progress your athlete to 30s holds, then 45 s holds.
  3. Exercise Complexity: Start with standard front planks.  Progress to single-leg holds, then marches (alternating which foot is on the ground in a controlled manner).
  4. Exercise Selection: Keep planks as part of a warm-up, but progress to more advanced linear core training exercises such as bar rollouts or bar rollout iso-holds.

Side planks would follow a similar progression.  The only difference is if you notice a side to side imbalance during the screening.  In this case, you’d want your athlete to perform their first set on their “good” side, then have them perform 3-4 sets on the other side.  Remember, if you add a balanced training program to an unbalanced athlete, you get an increasingly unbalanced athlete.  The key is to CREATE balance, but catering to your athletes needs.  If they have a lagging side, a program with 1 set on the good side and 3-4 sets on the lagging side will usually help create the balance that will keep them healthy.

Hip Strength

A lack of hip external rotation strength and hip abduction strength can be addressed using:

  1. Side-lying hip abduction w/ external rotation holds
  2. Glute Bridge with MiniBand (Shoulder width stance, hips abducted)
  3. Glute Bridge with MiniBand (Narrow hip width stance, hips externally rotated)
  4. Lateral MiniBand Walk
  5. Backward Monster Walk
  6. 1-Arm 1-Leg DB Stiff-Legged Deadlift (DB in hand opposite to foot on ground)
  7. All single-leg exercises

As mentioned above, if your athlete is noticeably weaker on one side, do NOT train both sides equally.  Have them do 1 set on their good side, and 3-4 sets on their weaker side.  Since some of the above exercises are bilateral by nature, an imbalance will dictate which exercises you include and which you don’t.  Or at least make sure you include one exercise that addresses the imbalance and any others to reinforce the strength bilaterally.

As for hip flexor and adductor strength, thing can get a little more complex there.  Luckily, I’ve already written in depth on this issue.  Rather than regurgitate everything I’ve already written, go ahead and check out my articles at SBCoachesCollege.com.  Part I has a lot of the hip mobility exercises I talked about last week, so it might be a good review.  Part II has the hip flexor and adductor strengthening exercises and progressions that are more relevant to this weeks topic.  I have to give Mike Boyle, Brijesh Patel, and Shirley Sahrmann most of the credit for the ideas and exercises that went into these articles and into my hip-specific analyses and programming.  They came up with most of this stuff, I just found a way to plug it all together into a system that works well for me.  Hopefully it’ll makes sense to you and you’ll have success implementing it with your athletes.

Keep working hard.

Please enter your first name and email below to sign up for my FREE Athletic Development and Hockey Training Newsletter!

Several years ago, Mike Boyle introduced me to this concept.  From time to time I get so caught up in my work that I forget to make time for anything else.  Rereading this often helps me remember those things that are truly important in life.  Hopefully it’ll do the same for you.

Big Rocks
“When things in your life seem almost to much to handle, when 24 hours in a day are not enough, remember the mayonnaise jar…and the beer.”

A professor stood before his philosophy class and had some items in front of him.  When the class began, wordlessly, he picked up a very large and empty mayonnaise jar and proceeded to fill it with golf balls ( your big rocks, what you fundamentally believe). He then asked the students if the jar was full.  

They agreed that it was.

So the professor then picked up a box of pebbles and poured them into the jar.  He shook the jar lightly.  The pebbles rolled into the open areas between the golf balls.  He then asked the students again if the jar was full.  They agreed it was.

The professor next picked up a box of sand and poured it into the jar.  Of course, the sand filled up everything else.  He asked once more if the jar was full.  The students responded with a unanimous “yes.”

The professor then produced two cans of beer from under the table and poured the entire contents into the jar, effectively filling the empty space between the sand.  The students laughed.

“Now,” said the professor, as the laughter subsided, “I want you to recognize that this jar represents your life.  The golf balls are the important things–your family, your children, your health, your friends, …”The pebbles are the other things that matter like your job, your house, your car. The sand is everything else–the small stuff.

If you put the sand into the jar first,” he continued, “there is no room for the pebbles or the golf balls.  The same goes for life.  If you spend all your time and energy on the small stuff, you will never have room for the things that are important to you.  Pay attention to the things that are critical to your happiness.  “Take care of the golf balls first, the things that really matter.  Set your priorities.  The rest is just pebbles and sand.”

One of the students raised her hand and inquired what the beer represented.

The professor smiled. “I’m glad you asked. It just goes to show you that no matter how full your life may seem, there’s always room for a couple of beers.” 

Please enter your first name and email below to sign up for my FREE Athletic Development and Hockey Training Newsletter!

Isometrics (producing muscular force without a change in total muscle length…think of pushing against a wall) are probably one of the most effective, and under-utilized forms of training.  Other than wall sits (which is a stupid exercise in my opinion), many hockey players never use isometric training at all.

I love isometrics.  

I think they’re great for:

  1. Building sport-specific work capacity.  
  2. Building strength in a specific range of motion (isometric strength transfers about +/- 10-15 degrees from the joint angle that the exercise is performed.  For example, holding a squat position with a 90 degree bend at the knee and hip would produce increases in muscular strength for knee and hip angles from about 75-105 degrees.) 
  3. Building MENTAL strength and toughness, as nothing slaps you in the face like pushing/pulling as hard as you can against something that won’t move.
  4. Altering the stimulus to your body during a periods of high frequency training or during a deload period.  Fatigue is contraction-type specific, meaning the mechanism of decreases in force production differs depending on whether the contraction is dynamic (concentric and eccentric), or static (isometric).  Because all these contractions are used in ice hockey (and in life for that matter), I think it’s important to improve the body’s capacity to handle these loads.

Last night I came across a great exercise from Cal Dietz, the University of Minnesota Hockey Strength Coach.  While, semantically, I may disagree with calling this a deadlift (which I think requires a greater loading of the posterior chain-e.g. glutes and hamstrings), I still think it’s a phenomenal exercise that all players would benefit from.  You could also perform several variations of this exercise, such as having the bar across the athletes shoulders (set between two sets of pins so that they can get under the bar, resting on the first set of pins, and push up against the second set of pins set a few inches higher).  

Another variation would be to perform a an overhead pressing movement against pins from the same position.  The great thing about this variation is that it’ll necessitate full body force transfer.  If you push harder with your upper body than your lower body, you’ll just sink.  Having said that, there’s no excuse (other than poor core stability and strength) for not being able to match overhead pressing force with leg drive force, even from this position.

Enjoy the video…

Please enter your first name and email below to sign up for my FREE Athletic Development and Hockey Training Newsletter!

Despite my background and involvement in ice hockey, I get more questions on a daily basis about fat loss than any other topic.

Should I lift weights?

How much cardio should I do?

What supplements do you recommend?

How do you find time to prepare healthy meals all the time?

To which I respond:  Yes. 3-4 high intensity interval training sessions per week.  Hard work and dedication. Make time.

Usually not satisfied by this response, I usually get a continued stare.

“Cmon.  What should I REALLY do?”

So here it is, my ultimate secret revealed!

The truth is, I’ve been training like a dedicated athlete for years, and was never able to manipulate my body fat like I am now.  So what was it?  A change in my training? A change in my diet?  A change in supplementation?

The answer: All of the above, under the guidance of Dr. John Berardi.  No, I don’t work with him personally.  That’s not necessary.  He did such a good job with putting together the Precision Nutrition program that I’ve never had to.  I read through it once, and instantly understood why I hadn’t been able to drop body fat in the past and what I needed to do to lose body fat in the future.

Precision Nutrition

He also includes Gourmet Nutrition, a cook book with recipes of all kinds (appetizers, entrees, desserts, smoothies, etc.) with recommendations on when to consume each (anytime vs. post-workout).  As if that wasn’t enough, the program also comes with access to an online community, with a wealth of articles, answers to any question you could think up, recipes, and forums use as a support network.  I was baffled that so much came in one package, and frustrated I hadn’t come across it earlier.  I actually used a modified version of the “Get Shredded Diet” he provides at the Precision Nutrition website in my recent 6-week fat loss experiment.

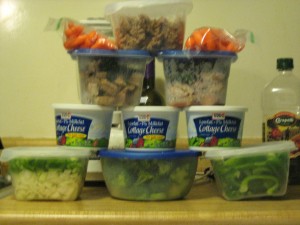
I’ll admit, the preparation that goes into making sure you have a healthy option for every meal of the day can seem like a daunting task.  Dr. Berardi provides some helpful hints into how to save time though.  Just this week I noticed that I pulled into the Stop n Shop parking lot at 7:10pm.  By 9:00pm, I had completed preparing meals for the week (or at least the first half of the week.  We’ll have to see how hungry I get), as well as having cooked and eaten dinner (a 3-egg pepper, onion, and cheddar omelette), as well as cleaned all the dishes.  And because I had so much spare time on my hands, and because my digital camera doesn’t get a lot of use, a picture of my food preparation efforts stacked for your viewing convenience is shown below.

Food for the Week

Figure 1. Displayed food involves chopped onions and green peppers for easy omelette making, 4 heads of chopped broccoli, 3 sliced green peppers, 3 tubs of “Reese’s Cottage Cheese”, 6 pork chops (chopped into bite size pieces), 10 oz steamed spinach, 1 lb of cooked ground turkey, and conveniently bagged baby carrots.

As an aside, the cottage cheese containers are filled with what I call “Reese’s Cottage Cheese”, a trick I learned from Berardi on how to make foods I don’t like (Cottage Cheese) taste like foods I do like (Reese’s Cups).

The secret to having healthy choices for every meal?  Plan ahead, cook all at once, and store everything in tupperware.  With this set-up, I can heat up and eat a meal in less than 10 minutes.  I can eat the Reese’s Cottage Cheese with ZERO prep time.  And cooking all at once saves countless hours throughout the week.

Keep working hard…but plan smart too.

Please enter your first name and email below to sign up for my FREE Athletic Development and Hockey Training Newsletter!

Back to cleaning up groin pain issues in your hockey players

After improving soft-tissue quality through foam rolling, “lacrosse balling”, and manual therapy, the next step is to stretched the newly “released” muscles.  It’s particularly important to focus on the muscles surrounding the hip.

As a reminder, the side-to-side discrepancies in range of motion or strength are the greatest risk factors for injury.  In general, when your athletes have a side-to-side discrepancy, you’ll want to stretch the tight side and strengthen the “looser” side, but use your judgement here based on what you found from your previous analysis.

I’ve posted a few of these videos before, but it never hurts to see them again.  These are all mobilization videos, but almost all of these positions can be held as stretches.  Make sure you’re moving/stretching in all three planes (frontal, sagittal, and transverse), so you aren’t lengthening the same parts of the muscles every time you perform a stretch or mobilization.  This tri-planar movement idea was popularized by Gary Gray years ago during the Functional Training Frenzy, but has since been reinforced by Mike Boyle and Brijesh Patel.  They make a good point-if athletic movements involve movement in all three planes, so should your training.

On to the videos:

Lying Knee-to-Knee Mobilization (If athlete lacks internal rotation ROM)

[quicktime]http://www.kevinneeld.com/videos/Lying%20Hip%20Internal%20Rotation%20Mobilization.mov[/quicktime]

Rectus Femoris Mobilization This is a good one if your athlete has tight hip flexors (All athletes have tight hip flexors)
You should also perform this without grabbing your back foot and with varying levels of internal and external rotation of the back leg.  In all cases, you’ll want to maintain some tension on your butt of the side of the back leg.  This will help keep your pelvis stable and core tight so you’re mobilizing your hip flexors instead of your low back.

[quicktime]http://www.kevinneeld.com/videos/Rectus%20Femoris%20Mobilization.mov[/quicktime]

Adductor Mobilization with External Rotation
Like hip flexor restrictions, almost all hockey players have very strong and tight adductors.  This is a great one to loosen up the adductors of the stretched leg, including the gracilis (which doesn’t get lengthened in stretches where the knee is bent) and the medial hamstrings.  It’s somewhat hard to see in the video, but basically all I’m doing is shifting my hips straight back, not allowing ANY movement of the lower back (neutral lumbar spine).  Stop when you feel your lower back rounding or when you reach the end of your range.

[quicktime]http://www.kevinneeld.com/videos/Adductor%20Mobilization-Ext%20Rotation.mov[/quicktime]

Wide Standing Hip Mobilization
It’s important to include standing mobilizations as well since the role of the nervous system changes when you move between lying, seated, kneeling, and standing positions.  Because most sports are played from an upright position, this is the most relevant environment for the nervous system to be trained in.  In a nutshell, it’s not enough to improve mobility in lying, kneeling, or seated positions.  This improves hip rotation ROM.

[quicktime]http://www.kevinneeld.com/videos/Wide%20Standing%20Hip%20Mobility.mov[/quicktime]

Diagonal Standing Hip Mobilization
Similar to the above mobilization in concept, this exercise adds a more hockey-specific hip position.  When you rotate away from your back leg, do so my contracting your glutes hard on the back leg.  Remember, everything should be actively pulling your body into these positions.  Nothing is passive or momentum-based at all.

[quicktime]http://www.kevinneeld.com/videos/Diagonal%20Standing%20Hip%20Mobility.mov[/quicktime]

In-Line Split Squat
This improves hip mobility in the frontal plane by taking both hips into relative adduction.  Line up both feet and drop your back knee straight down so that it falls in the same line as your feet.  Keep your hips and shoulders level and square to straight ahead as much as possible.  You can make this more challenging by adding a rotation over your front leg or a side bend to the side of your front leg in the bottom position.

[quicktime]http://www.kevinneeld.com/videos/In-Line%20Split%20Squat.mov[/quicktime]

Reverse Crossover Lunge
This is a great exercise I borrowed from Brijesh Patel.  This brings everything together, improving hip range of motion under the control of musculature that’s functional to athletic movement.  You can add a side bend or rotation to this as well, but most people find it difficult enough as is, at least in the beginning.

[quicktime]http://www.kevinneeld.com/videos/Reverse%20Crossover%20Lunge.mov[/quicktime]

Try performing these exercises for 8 repetitions on each side in a circuit.  If you feel extra locked up or restricted during any exercise, or on one side of an exercise, repeat it for that side in that exercise only.  I’m guessing your hips will feel “freer” than you’re used to after you go through these.

Keep working hard.

Please enter your first name and email below to sign up for my FREE Athletic Development and Hockey Training Newsletter!

Use CODE: "Neeld15" to save 15%