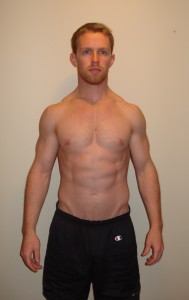
That’s it.  I quit!  After 6 weeks of low calorie eating, I’ve had enough.  A lot of people asked why I was on a low calorie diet to begin with.  I think it’s important to cycle calories, as well as macronutrient (carb, protein, fat) sources periodically.  In other words, if you usually eat a low calorie diet, cycle in periods of higher caloric intake.  If you usually eat a high calorie diet (me), cycle in periods of low caloric intake.  There are also additional health benefits to dropping body fat, notably that toxins are stored in fat tissue, so shedding some fat periodically will help release some of these toxins and clear them from your body.  

Those are the reasons I usually gave people, but to be honest, that had nothing to do with why I went on a the diet.  The real reason: It sucked.  It was hard.  With my hockey career officially over, opportunities to really challenge myself physically and mentally are somewhat limited.  Going on a very strict, severely limiting diet was one way to see if I still had it, to test my mettle.  Overall, I’m happy with how I was able to stick through it.  

                Before (180.5 lbs)                                                                                     After (166.0 lbs)
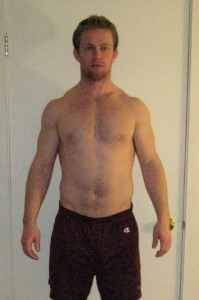
           1/6/09: Front-Close                    2/14/09: Front


So why give up after 6 weeks?  My original thought was to try this out for 6-10 weeks, so I’m not really bailing out early.  Having said that, I have 5 great reasons to start eating a more “normal” diet (more calories and slightly more carbs):

5) No matter how lean I get, my skin will still be impressively pale, verging on translucent, and dangerous for other people to look at.  

4) I miss smoothies and ketchup.  I put ketchup on everything.  So should you.  But when you’re only afforded 50 g of carbs per day, you can’t use them haphazardly.  No ketchup for the last 6 weeks.  It’s been rough.  On the same note, I usually throw back two smoothies a day.  I showed my friend Mike how I make them.  After his mockery (apparently smoothies aren’t a manly meal choice), he agreed they were delicious and began making his own…with a modified recipe.  The “recipe” looks something like:

  • 16 oz 1% Milk
  • 6 Tablespoons Teddy’s All Natural Peanut Butter
  • 2 Bananas
  • 2 Cups Frozen Mixed Berries
  • 3 Scoops Chocolate Muscle Milk
  • 10 g SAN BCAAs
  • 5 g SAN Creatine
  • A rack of lamb

What does this have to do with my diet?  Mike managed to take my entire day’s worth of calories, and blend them into one delicious smoothie.  Diet out.  Smoothies in.    

3) I’m too performance-oriented to several restrict my calories.  Despite an intelligent supplement menu throughout my low calorie eating, my training has still taken a pretty big hit.  I haven’t lost too much strength, considering the amount of weight I lost, but I haven’t gained any either.  A little more carbohydrates (more than the 50g/day I’ve been eating) and a few hundred more calories/day will go a long way in helping me get back on track in improving my strength and speed, while maintaing my body weight.  I also want to add more conditioning into my training.  More conditioning equates to more fat burning and more calorie burning.  In a nutshell, I can eat a lot more calories and not gain any fat if I offset it when an intelligent conditioning program. My new motto: Smaller, stronger, faster.

2) Undersupplying your mind and body with energy isn’t really conducive to training hard, running a business, coaching a hockey team, training clients, reading and analyzing research, writing articles, taking graduate classes, and teaching undergraduate classes.

And finally….

1) My lovely girlfriend saw me at 166 lbs and told me I look like a “scrawny little bitch”.  Ha!  I have to admit, as much as I don’t typically care about what other people think about how I look (I’d be more offended if someone called me weak than if someone called me fat), I found it hilariously ironic that I lost body fat and she, of all people, made fun of me.  For some reason I thought leaner was better in the female eye.  6 weeks of low calorie dieting taught me two important lessons: (1) I love food too much to do something like this consistently (although I did gain a whole new respect for bodybuilders that do this sort of thing on a fairly regular basis to prepare for competitions); and (2) I still know nothing about women.

Back to hockey content tomorrow…


Please enter your first name and email below to sign up for my FREE Athletic Development and Hockey Training Newsletter!

This was the last week of my 6-week fat loss experiment.  My training won’t significantly change, but my diet will.  More on this in the days to come.  Training results for the last week are posted below.  

Valentine’s Day Words of Wisdom

George Costanza once said, “If you can’t say anything bad about a relationship, you shouldn’t say anything at all.”

Happy Valentine’s Day to all of you in relationships.

For the rest of you, nothing says “People in happy relationships make me sick” like heavy deadlifting.

Feb 8, 2009: Weigh-In 168.5 (Water Loading Begins!)
A1) Back Squat: 135 x 5; 225 x 3; 315 x 4; 335 x 2 sets of 4; 335 x 3; 315 x 4
A2) Bird Dog Hold: 3 x 15s each
B1) Stiff-Legged Deadlift: 225 x 4; 295 x 4 sets of 6
B2) Front Plank March: 4 x 20s
C1) 1-Leg Squat:3s Negative: 3 x 6 each 
C2) Glute Ham Raise: 3 x 12
CON) Overhead Side-Side MB Floor Slams 10lb Ball, 8 x 6 slams each side (12 total per set); 30s rest between each set

Feb 10, 2009: Weigh-In: 167
A1) Standing Shoulder Press: 95 x 4; 135 x 6 sets of 3
A2) Scap Wall Slides (Back to Wall): 4 x 8
B1) Weighted Chin-Up: BW x 5; BW+45 x 3; BW+55 x 3; BW+65 x 3 BW+55 x  2 sets of 3
B2) DB Triceps Extension Ecc-to-Close Grip Con: 2 x 45DB x 5 sets of 6
C1) 1/2 Kneeling Chop: To Right Only; 50 lbs x 3 x 8
C2) Face Pull w/ External Rotation: 110 x 3 x 12

Feb 12, 2009
A1) Front Squat: 135 x 5; 225 x 3; 185 x 3 sets of 8
A2) Side Plank w/ Abduction Hold: 3 x 15s each
B1) DB Back Leg Raised Split Squat: 2 x 70DB; 4 x 4
B2) 1-Arm DB 1-Leg SLDL: 1 x 40 DB; 4 x 6 each
B3) Bar Rollout: 4 x 10
B4) Stability Ball Hamstring Curl: 4 x 12

Feb 13, 2009: 7am Lift!
A1) Bench Press: 135 x 6; 225 x 2 sets of 6; 225 x 5; 205 x 6
A2) I, Y, T Holds: 1 x 30s each
B1) 1-Arm DB Row: 85 DB; 3 x 8 each
B2) Standing Cable Chop: To Right Only; 50 lbs x 3 x 10
B3) 1-Arm DB Push Press: 50 DB; 3 x 8 each
B4) DB Hang Clean-to-Curl Eccentric: 2 x 45DB; 3 x 6
B5) Bird Dog: 3 x 10 each
CON) 10 x 10 Medicine Ball Overhead Floor Slams; 8lb Med Ball; 30s rest between sets

Please enter your first name and email below to sign up for my FREE Athletic Development and Hockey Training Newsletter!

One of the first steps to dealing with groin pain is to restore proper range of motion (ROM) around the hips.

Side note: ROM is also referred to as flexibility or mobility.  Although joint mobility in physical therapy refers to an involuntary movement of the bones in the joint, the term mobility is often used in non-physical therapy settings to refer to range of motion.

The first question you should have is: What is proper ROM?

Like most things, the answer is: It depends.

In some cases, excessive ROM is actually the problem.  In a recent presentation, Shirley Sahrmann noted that most injuries occur in the area/side of the body with MORE range of motion.  Essentially, injury results at the place of least resistance.  This seems counterintuitive since most people associate feeling tight with injuries.

I think the area for optimal athletic performance lies in the middle of the two extremes.  While tightness could POTENTIALLY minimize injury risk, there is often a given set of ROMs that different joints of the body must go through during athletic competition.  Inability to achieve these ROMs will inevitably lead to decreased performance, or, at a minimum, compensatory movement patterns that lead to an injury in another area of the body.

Through the analysis we’ve gone over for the last two weeks, you should have a good idea of ROM restrictions and/or side-to-side discrepancies.  Your first goal with addressing these is to bridge the gap between sides.  In other words, make the right and left sides even.  If you have 40 degrees of internal and external rotation in your left hip, but 20 degrees of internal and 40 degrees of external rotation in your right hip, your first priority would be to increase internal rotation ROM in your right hip.  Make sense?

In hockey players, decreased hip internal rotation and lack of hip extension (e.g. lack of hip flexor extensibility/flexibility) are often problems and should be addressed through soft-tissue work and specific exercises geared toward improving the ROM.

Will You Respond to Stretching?

In my experience, countless stretching time can be spent with little improvements to show for it.  This can be due to a number of reasons, but two primary ones are inappropriate contraction of the stretched muscle and soft-tissue restrictions.  I address the neural component below.  Regardless, if you find yourself stretching and feel like you’re getting nothing out of it or that your muscles just flat out won’t lengthen, you probably need some soft-tissue work.

Nothing will relieve soft-tissue restrictions as quickly as a visit with a good Active Release Techniques Practitioner.  In the hands of a good A.R.T. therapist, long-standing (years)  restrictions can often be cleared up in a couple visits.  Having said that, good A.R.T. people can be hard to find and, depending on your insurance policy, expensive.

A viable, cheap alternative is to perform self-myofascial release using a 6″ foam roller, 4″ PVC pipe, or lacrosse ball.  For those of you that are unfamiliar with foam rolling and related techniques, I’ve posted a few videos below.  All hockey players benefit from these:

Gluteus Maximus/Hip External Rotators

[quicktime]http://www.kevinneeld.com/videos/Lax%20Ball-Gluteus%20Maximus.mov[/quicktime]

Hip Flexors (Tensor Fascia Latae)

[quicktime]http://www.kevinneeld.com/videos/Foam%20Roll-IT%20Band.mov[/quicktime]

Quadriceps

[quicktime]http://www.kevinneeld.com/videos/Foam%20Roll-Quadriceps.mov[/quicktime]

Active vs. Static Flexibility

Static flexibility, the ability to move through a given ROM passively (without active muscle contraction) is of little important in athletics.  This is a major downfall of traditional stretching approaches.  The reason should be somewhat obvious.  If you find yourself in a game, not actively contracting any muscles, you’re probably on a stretcher.

Active/functional flexibility is more “sport-specific”, since it encompasses other factors that could potentially limit ROM (notably the excitatory and inhibitory influences of the nervous system).

I don’t mean to dismiss the role of traditional stretching.  In fact, I think most people would benefit from MORE stretching.  The simple change I’d recommend making is contracting/squeezing the antagonist (muscle opposite to that your stretching) while you’re stretching.  This will train yourself neurally for stability by teaching your body to actively pull a joint into a ROM, instead of passively letting it happen.  Due to reciprocal inhibition (a neural process whereby contraction of one muscle leads to an inhibition/relaxation of the antagonist, or opposing muscle), you will also achieve greater ROM improvements using this technique.

Wrapping Up…

This is a long post for a Friday, so I’m going to wrap it up here.  Improving functional flexibility is a necessary step in addressing/preventing groin pain in your athletes.  In the future, I”ll post some more stretches and mobilizations that I’ve found particularly effective in improving functional ROM around the hips.

Enjoy your weekend.

Please enter your first name and email below to sign up for my FREE Athletic Development and Hockey Training Newsletter!

At this point I thought it would be a good idea to recap all the things we’ve discussed over the last week.  Below is a summary of the process I take when an athlete comes to me reporting groin pain.

1. Question about the nature of the pain

  • When did the pain/discomfort start? Was there a specific incidence that caused it?
  • Where is your pain located?
  • What does the pain feel like? Dull aching, sharp, radiating, etc. 
  • What types of exercises/movements cause pain?  Is the pain immediate or does it come afterwards? 
  • Describe the intensity of the pain.  On a scale from 0-10, 10 being unbearable excruciating pain, where would you rate your pain when it first comes, a couple hours later, the next day, etc?
  • How long does the pain last?

2. Posture Analysis

  • Hip Position: Anterior/Posterior Pelvic Tilt, Lateral Pelvic Tilt, Rotation
  • Knee Position: Knee caps pointing in? Relatively in line with femur and tibia?
  • Foot Position: In-/Out-Toed? Flat footed? Check shoes-Note uneven wear on inner (excessive pronation-usually excessive hip internal rotation )or outer borders (excessive supination)

3. Range of Motion Analysis

  • Thomas Test: Extensibility of hip flexors. Note compensatory rotations with lengthening
  • Hip Internal/External Rotation ROM: Test with hips flexed to 90 degrees and with hips extended
  • Quadruped Rocking: Note maximum hip flexion before lumbar rounding

4. Muscle Function Test

  • Seated Psoas Test: Note ROM, strength, and compensatory motion on each side
  • Side Lying Hip Abduction: Note ROM, strength, and compensatory motion on each side
  • Front Plank: Endurance test for time
  • Side Plank: Endurance test for time on each side

5. Movement Analysis

  • Double-Leg Movements: Squat, Deadlift, and Stiff-Legged Deadlift Patterns
  • Single-Leg Movements: 1-Leg Squat, 1-Leg Deadlift, 1-Leg Stiff-Legged Deadlift, and Reverse Lunge Patterns
  • In all movements, note movements of the knee, hip, and lumbar spine, keeping the whole body movement in mind.

By completing the above screen/analysis, I have a better idea of any predisposing factors or resulting functional impairments related to the athletes groin or hip pain.  This will allow me to communicate more effectively with an athletic trainer, physical therapist, or sports physician (if the athlete is lucky enough to have access to any of these professionals).  At a minimum, it will give me an idea of areas the athlete’s abilities and areas that need improvement or areas to avoid.

Next up: How to get back on track following a groin injury…

Please enter your first name and email below to sign up for my FREE Athletic Development and Hockey Training Newsletter!

The final step in our groin pain analysis is to look at a few movement patterns and see if you can pick up on any “abnormal” movement.  

Nothing too complicated here.  Basically we just want to have them perform a couple double-leg and single-leg movements and note the positions of the femurs, hip, and lumbar spine.  

Double-Leg Movements

  1. Squat Pattern (Hands behind head)
  2. Deadlift Pattern (Hands at side)
  3. Stiff-Legged Deadlift Pattern (Hands on front of legs)

Single-Leg Movements

  1. 1-Leg Squat
  2. 1-Leg Deadlift
  3. 1-Leg Stiff-Legged Deadlift
  4. Reverse Lunge

With all the other information we’ve collected at this point, some of the movement impairments should be pretty easy to pick up on.  For instance, if your athlete didn’t have hip flexion above 90 degrees during quadruped rocking, you’ll probably notice some sort of compensatory movement (probably at the lumbar spine) during the double-leg movements when this hip angle is reached and likely some form of rotation during the single-leg movements.  

Two of the other big things to look for are the knees caving in during any of the movements, and the femur internally rotating during the single-leg movements.  In general, this is indicative of poor strength and/or motor control of hip abduction and/or external rotation and will lay the foundation for some of the future training to prevent the reoccurrence of groin/hip injuries.

An important note: Remember that if your athlete ALREADY has groin pain, it’s possible that any movement abnormalities that you observe are a RESULT of the injury/pain and NOT the cause of it.  Frequently the two will go hand in hand, but it’s important that we don’t automatically assume it’s the poor movement causing the pain, and not current pain causing circumstantial poor movement.  

Keep working hard…

Please enter your first name and email below to sign up for my FREE Athletic Development and Hockey Training Newsletter!

Use CODE: "Neeld15" to save 15%