Do you think like this?

Most hockey teams skate 3 lines consistently.

Most shifts are about 45 seconds.

If you were thinking about designing an overload-based conditioning program for hockey, the logical conclusion would be to:

  1. Put together intervals using a 1:2 work to rest (3 line system)
  2. Have the work intervals be between 30-60 seconds

Not a bad start.  It’s certainly better than the old “okay, now jog 8 laps around the rink as a team”.  Nothing will guarantee you a slacking, unmotivated, and probably injured team like that recommendation (Admittedly, I’ve both given AND received that type of program in the past, so don’t despair if that’s what you’re using now.  Read on…).

Think about this:

Most shifts last 30-45 seconds, ON THE CLOCK.  In real-time, this typically translates to 2-3 10-15s shifts, with stoppages of play interspersed throughout.  

Even within a continuous 45 second shift, rarely are players skating full speed throughout.  Usually shifts are broken up by periods of gliding and stopping altogether.

There’s nothing wrong with conditioning using:

10 x 20s work and 40s rest intervals

or 8 x 30s work and 60-90s rest intervals

A unique conditioning model 

Keeping in mind the demands of a hockey game, I’ve been spending more time playing around with interval conditioning like this:

  1. 12 x (30s work 1/10s work 2)/30s rest
  2. 5 x (4 x (10s work/20s rest))/2min rest

In the first example, the players would alternate the work times so that the protocol would go:

30s work, 30s rest, 10s work, 30s rest, 30s work, 30s rest, 10s work, 30s rest, etc., with every work interval counting toward the 12 so that they’d perform 6 x 30s work intervals and 6 x 10s intervals. 

In the second example, the players would perform 4 sets of 10s work then 20s rest in a row (2 minutes total), then take a 2 min rest, then repeat this five times through.  

Both of these examples allow hockey players to work at work:rest ratios that are more similar to what they face in games, maximizing the on-ice carryover.

I hope that makes sense.  Keep working hard.

Please enter your first name and email below to sign up for my FREE Athletic Development and Hockey Training Newsletter!

What’s the hockey training secret to success?  

I’ve written a lot about the proper way to train the core, how to create adequate mobility and muscular balance around the hip to prevent groin and hip flexor injuries, how high intensity interval training is the only way to go for hockey players, why single-leg training is more appropriate than double leg training for athletes, and how to incorporate all of these things into one cohesive program. 

The truth is that none of that matters.

You will NEVER be successful if you aren’t willing to push yourself.
You will NEVER be successful if you aren’t willing to outwork your competitors.
You will NEVER be successful if you look for a handout from someone else. 

The ultimate key to hockey training is simple:   

Possess an inner drive that will not accept failure, ever.  

Always ask yourself if you have more to give.  If the answer is yes, then give it.  There will always be excuses-lack of time, lack of energy, linemates aren’t good, goalie had a bad game, no one else was working hard.  I could go one for hours. I’ve heard them all.  

It’s easy to make excuses.

That’s why, at the end of the season, there’s only one champion.

Keep working hard.  Keep working smart.

Please enter your first name and email below to sign up for my FREE Athletic Development and Hockey Training Newsletter!

I’m cheating today, by stealing content from my colleague Kim McCullough.  I came across a couple videos she put together on hockey-specific speed and power training.  She primarily targets female hockey players, but I assure you that these drills are equally as effective for hockey players of both genders (I’ll speculate that Kim would agree with me here).  

I want you to focus on the 1-leg medial and lateral jumps, what Kim calls jumps “in” and jumps “out”.  Rarely do hockey players skate in a straight line for any extended period of time.  As a result, most of the explosive movements in hockey use the patterns that these exercises train.  The benefit of performing these exercises up stairs is that it cuts down on the landing impact.  Start on the stairs then start incorporating some flat ground jumps.    

While I don’t have any gripe with any of the exercises, I tend to stay away from ladder drills. I actually bought two ladders about a year ago, and they haven’t left the trunk of my power-packed 4-door family sedan.  I find that quick foot work can be trained by other means that don’t require staring at your feet.  Although, Kim does an excellent job in this video of keeping her head up.  But I’ll digress to the video…


And a follow-up on the single-leg movements:


As an aside, Kim put together a great product for youth hockey players and coaches, incorporating everything from off-ice training to nutrition to mental preparation.  Since I also have a similar product out, you might be wondering why I mention it at all.  My three top reasons:

  1. Kim’s “Best Hockey Season Ever” goes into greater depth on the mental side of things, which I think is EXTREMELY underemphasized in youth hockey.  
  2. I’m not the type to withhold valuable information, even if it costs me money in the long run.
  3. Why get just one?  NOBODY that is serious about ANYTHING relies strictly on one resource.  I suspect that those hockey players and coaches that are truly dedicated to fulfilling their potential will invest in both products.

Dig deep…Keep working hard.

Please enter your first name and email below to sign up for my FREE Athletic Development and Hockey Training Newsletter!

The question I get more than any other is “How can I lose weight quickly?”  and/or “How can I lose FAT quickly?”  Last week I revealed my ultimate Fat Loss Secret: Dr. John Berardi’s Precision Nutrition System.  It’s by far the best resource to rapidly losing fat and KEEPING IT OFF.  I couldn’t say enough good things about it.

I don’t know a single person that couldn’t benefit from being stronger.  With that said, there are some great resources on how to improve strength and power.  Way more than on realistic/effective dietary changes.  With that said, in my experience, nothing will lead to more rapid strength increases than listening to Avenged Sevenfold while you lift.  

It’s so simple.  Just put this on, and you’re guaranteed to increase your strength by at least 10%.

If that doesn’t work, check your pulse.

No pulse?  Have a Spike! (but not two…that may kill you)

Spike 4-Pack

Keep working hard…

– Kevin Neeld

Please enter your first name and email below to sign up for my FREE Athletic Development and Hockey Training Newsletter!

Yup-worst title ever, but it got you this far…

In light of discussing hockey and soccer related groin pain for the last couple weeks, I thought I’d give a personal example that will help illustrate how some of the things we’ve talked about come together.  I’ve had off and on knee and hip problems on the left side.  Basically, I feel extremely unstable at both joints and something just feels off.

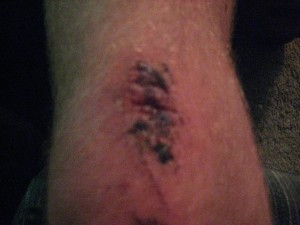
I never had any problems with my knee until I took a horrible gravel-related spill demonstrating a double lateral bound into 5-yard sprint exercise (a great drill to teach explosive lateral movement with sharp direction changes).  That brilliant display resulted in:

Nice Knee

Knee hasn’t been the same since.  But I have a history of groin pain on that side and had inguinal hernia surgery on that side as well.  In a nutshell, even with everything I’ve learned about hip and lower abdominal injuries over the last few years, I still thought my left hip was the problem.  

Recently I started high-intensity interval training on a bike.  I found that my hip and knee felt considerably more stable and symmetrical FOLLOWING the interval training.  To give you an idea, I basically fall off the bike, and walk without a knee bend because my quads and glutes are so stiff…but my hip and knee feel better. Hmm.

I did some digging around and some strategic stretching and noticed that my right rectus femoris AND psoas are WAY tighter than the same muscles on the left side.  The psoas is also a lateral rotator of the femur.  Without going into a complex functional anatomy lesson here, basically my rectus femoris and psoas were extremely tight, which resulted in my lumbar spine (the origin of the psoas) pulling slightly to the right, my right femur maintaining a slightly laterally/externally rotated position (which was accompanied by adaptive shortening of the hip lateral/external rotators).  As a result, my left hip was in a slightly medially/internally rotated position, which affected how I walked, leading to a slight hyperextension of my left knee and noticeably asymmetrical movement.  

The Bottom Line: Right Hip Problem Resulted in Left Hip and Knee Symptoms

The fix?  Stretch the hell out of my psoas and rectus on the right side.  Strengthen/shorten my psoas on the left side.  Or, in the interest of saving time while training, do both using the exercise below.


I probably started a bit high in this video, but the idea is that you strengthen/shorten your psoas by maintaining a hip flexion position above 90 degrees, while actively squeezing your glutes on the down side, which facilitates a stretch on your hip flexors.  Better/faster results comes with more time/attention paid to the problem, but if you’re in a time jam, this is a great “bang for your buck” exercise.  

Keep working smart…

Please enter your first name and email below to sign up for my FREE Athletic Development and Hockey Training Newsletter!

Use CODE: "Neeld15" to save 15%