Today’s “Thursday Throwback” is a quick one from 2009. This continues to be a trend we see in our assessments today and I think, while basic, highlights that you can go wrong on both ends of the flexibility continuum. Those that are too immobile at one joint are likely to move excessively at another. Those that are too mobile at one joint may be more likely to suffer from injuries as a result of a lack of stability and/or constant attempt to manage the instability (e.g. muscle injuries). This is why optimizing movement is such an important concept!
Enjoy the post below:
Does Flexibility INCREASE your risk of injury?
A couple weeks ago I did an audio interview with Joe Heiler for SportsRehabExpert.com, one of the most underrated membership sites on the web. I’m really humbled that he asked me to contribute.
If you’ve never been there, check it out. Joe’s a really bright guy and has compiled a lot of great information from other smart, successful coaches and therapists.
One of the things that came up during the interview was what we can do to prevent “groin” (adductor) strains. We’ve been fortunate in that we haven’t had too many adductor injuries in our athletes. This is probably, at least in part, due to the hip mobility and hip muscle activation exercises we use.
We did have a couple athletes complain of adductor pain though, and they all had ONE thing in common:
OUTSTANDING ADDUCTOR FLEXIBILITY!
This trend flies in the face of the “you got hurt because you didn’t stretch or aren’t flexible enough” way of thinking.
In these athletes, we were able to resolve their pain relatively quickly, by having them STOP STRETCHING their adductors, start stretching their glutes a few times a day, and by doing isometric adductor strengthening exercises by crushing a medicine ball between their knees for time.
The rationale was simply that their adductors were weak relative to their abductors (to be overly simplistic: weak groin, strong glutes).
By stretching their glutes and strengthening their adductors, we were able to shift the strength and stiffness relationship between those muscles into more balance and get rid of their pain within a week or two.
Last week was an exciting week for Emily and I as we bought our first home. We’ve bounced around from Baltimore to center city Philadelphia to Collingswood, NJ over the last 6 years, and finally decided to “settle down” and get a place in Cherry Hill. As always, the Endeavor Crew and my friend Shane made the move a breeze (it’s amazing what kind of work you get out of those guys for a few Chipotle burritos!).
It’s been an exciting, event-filled year to say the least!
A few months ago, I wrote an article outlining exactly how you could use specific training methods on a skating treadmill to elicit different adaptations.
The important take home from that article is that you can use one exercise (or tool) in a variety of ways that all cause the athlete to improve in very different ways. This is really true of any exercise and is one of the reasons why answering questions like “Is squatting good?” or “what’s the best exercise for…” so difficult. Everything always depends on who the athlete is, what he/she needs, how the exercise is performed (movement quality, load, speed, sets, reps, rest, etc.).
Many of our players are in a phase of their off-season program where the focus is on improving alactic power, or their ability to move explosively for short periods of time.
One method we’ll use is short duration slideboarding where the goal is to get as many reps as possible in the allotted time. The intent is to minimize glide time (you aren’t producing power while you glide) and “explode” from board to board as quickly as possible. The players then rest the remainder of the minute (e.g. 8s of work, 52s of rest) before going again. We’ll typically do this in two blocks of 6-10 reps, with 3-5 minutes between blocks.
The video below is of Rob Hennessey, who is headed to Providence as a freshman next year, demonstrating this method.
P.S. If you want to take the guess work out of your off-season training and start using a program proven to deliver results, be sure to check this out >> Ultimate Hockey Transformation
Please enter your first name and email below to sign up for my FREE Athletic Development and Hockey Training Newsletter!
6 AWESOME Nutrition Tips from Dr. Berardi
Today’s Thursday Throwback features 6 videos from Dr. John Berardi, the founder of Precision Nutrition. Dr. Berardi has been one of my go-to resources for nutrition information for the last 8 years. Not only does he stay on top of current research, but he’s the best in the industry at delivering nutrition information in a way that people will actually do it. I believe that most people have a general understanding of better and worse food choices, but few actually do. This seems to be a psychology/behavior change issue more than purely an information issue. This is really where Dr. Berardi excels. If you’re interested in learning more about Dr. Berardi’s system, check out this link >> Precision Nutrition
If you’re looking for something more hockey-specific, be sure to check out Brian St. Pierre’s Ultimate Hockey Nutrition. Brian currently works for Precision Nutrition and delivers high quality nutrition information in ways that are easy for players at all ages to implement.
6 AWESOME Nutrition Tips from Dr. Berardi
John Berardi is a brilliant nutritionist that has had a ton of success with a wide variety of people from elite athletes to non-athletes. His Precision Nutrition system is still the best nutrition product ever created. I think everyone should own a copy. For more information on Precision Nutrition, click here.
Below are 6 awesome videos of a TV interview that Dr. Berardi did with Christine Williams on the show “On The Line”. Take the time to watch these. Dr. Berardi goes through a lot of awesome nutrition strategies that will help you lose fat, and get lean and strong.
Part 1 – On The Line with Christine Williams
About me, my work, about the differences between athletes and recreational exercisers, and more…
Part 2 – On The Line With Christine Williams
How much protein should we eat, the body mass index, how to gauge progress, and more…
Part 3 – On The Line With Christine Williams
Advanced nutrition, healthy food/supplements, metabolism boosting foods, cravings, and more…
To learn more about how Precision Nutrition can help you get in the best shape of your life, click here.
Part 4 – On The Line With Christine Williams
Cutting cravings, metabolic slowdown with age, healthy recipes, fruits and veggies, and more…
Part 5 – On The Line With Christine Williams
Metabolism preservation, ideal rate of progress, crash dieting, loose skin, and we take some calls…
Part 6 – On The Line With Christine Williams
How to exercise, exercise for seniors, day 1 of your program, and more…
To learn more about how Precision Nutrition can help you get in the best shape of your life, click here.
Please enter your first name and email below to sign up for my FREE Athletic Development and Hockey Training Newsletter!
Get Ultimate Hockey Training Now!
“…an extremely rare comprehensive look at the present state of ice hockey training.”
“…a must-have for coaches and strength professionals at all levels of hockey.”
Fundamental Lower Body Movement Patterns
In this week’s “Thursday Throwback”, I wanted to share another article from 2009 that highlights the progressive differences in fundamental lower body movement patterns and how force production from the involved musculature shifts as body angles change. This idea has been described using different terminology over the last several years, including Mike Boyle’s classification as exercises being more “knee-dominant” or “hip-dominant” or what I describe in Ultimate Hockey Training, simply, as lower body pushing or pulling patterns. Terminology aside, it’s important to recognize how subtle changes in body angle changed the emphasized musculature so that you can choose exercises based on the specific result you want. If you have any comments/questions, please post them below. Enjoy!
Fundamental Lower Body Movement Patterns
This Summer I started working with a ton of new athletes at Endeavor Sports Performance. These athletes had been training, but not with me.
Part of building a solid training base is learning the three fundamental lower body movement patterns:
Stiff-Legged Deadlift The stiff-legged deadlift (SLDL) is largely a hip-dominant movement. You’ll maintain a slight knee bend, but the entire movement involves tilting the pelvis forward, then using your glutes and hamstrings to pull yourself back upright. The emphasis is almost entirely on the glutes and hamstrings.
Deadlift The deadlift pattern is similar to the stiff-legged version in that it involves tilting the pelvis forward as far as possible, but is different from the SLDL in that it involves a deeper bend of the knees. A bend of the knees means more force production from the quadriceps.
Squat You’re probably picking up on the trend here. The squat pattern uses slightly less forward tilting of the hips and slightly more knee bend, which involves more force production from the quads relative to the SLDL and deadlift patterns.
These differences in loading emphasis are pretty clearly illustrated by noting the maximal forward hip/torso angle in the “down” position of these exercises. During the SLDL, the torso is almost parallel to the ground. During the deadlift, the torso is slightly above parallel. During the squat, the torso is slightly more vertical than the deadlift. And during a front squat pattern, the torso is almost completely vertical.
It generally takes less than a month for the majority of my athletes to master these movements. Then it’s time to “load the hell out of them” and get them strong!
Last week I got an email from a guy with a ton of hockey and teaching experience asking about skating treadmill protocols. I haven’t written much about skating treadmills. I stopped using the one at our old facility because I was working to get players to skate LESS in the off-season, especially in the first few months, in an effort to unload the skating musculature and avoid issues related to perpetual overuse. In fact, I think the only time I’ve approached the topic was here: The Truth About Skating Treadmill
If you have access to a skating treadmill, I would encourage you to view training on it within two major buckets:
Improving the forward skating position and pattern
Improving some target physiological quality
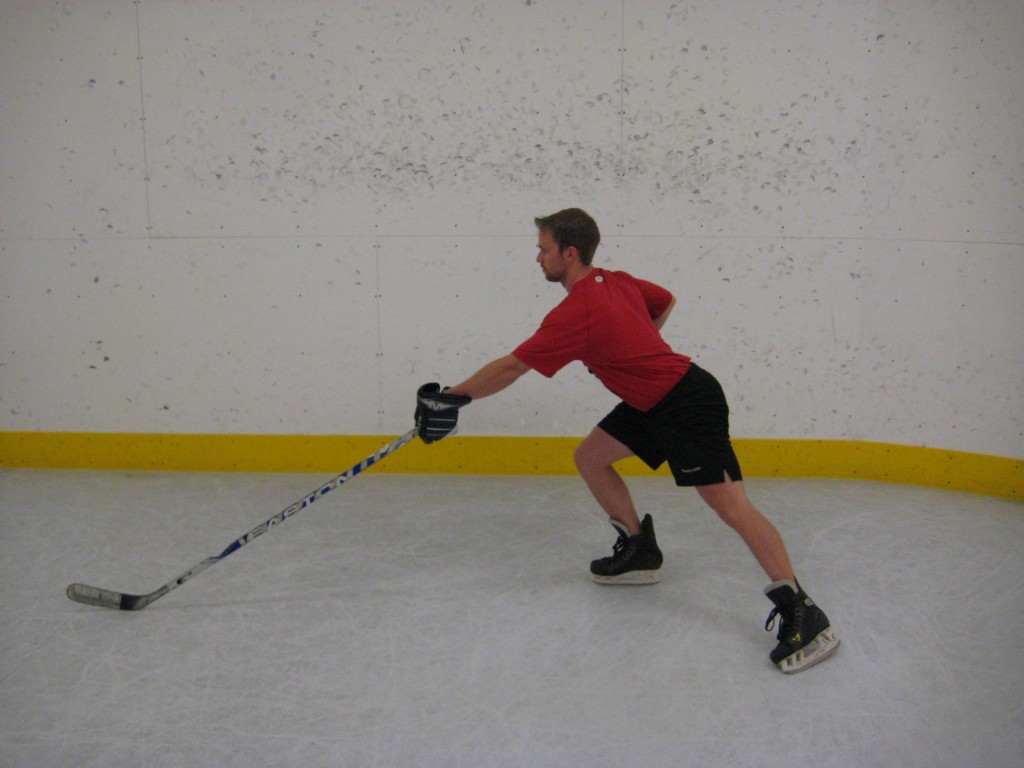
Me at our old facility. Took a while to (literally) shake the rust off, but I didn’t have to superman inside of the harness so overall not a bad day out!
This has nothing to do with anything, but it came up when I was searching for the old skating treadmill video and…it’s…awesome.
Related to the first point, there are very basic skating points that even elite players need to be reminded of periodically. I’ve discussed these in more detail in Breakaway Hockey Speed (which you can get for FREE by signing up for my free newsletter on the left sidebar of this page), but to get you thinking:
What is the lowest skating depth the player can achieve while maintaining a flat back?
Is the player recovering their stride leg under their body? On both sides?
Is the player fully extending the stride leg, ending by pushing through the toe?
Does the player have an appropriate arm swing with a forward and slightly inward reach to counterbalance the diagonal nature of the stride leg?
Does the player demonstrate stability and control of the torso/head?
Most of the time, you’ll find one or more of these areas that could be improved. As with any training pattern or exercise, it’s important players learn to skate well before they are put under increased training loads (higher inclines, higher speeds, longer durations, etc.). Naturally, they won’t perfect the skating stride in a single-session, but if they aren’t a proficient skater, the primary focus should be on improving their skating pattern. If you’re interested in more information on developing optimal skating technique, check out these posts:
Once a player demonstrates competency in their skating stride, you can focus more on training in a way that elicits very specific training adaptations. Think of the skating treadmill similar to running; you can alter your pace, duration, work:rest ratios, etc. to alter the specific adaptation you’re after. As an easy example, trotting at a steady state for 30 minutes may be an effective method to improve cardiac output, whereas sprinting for 6 seconds with full recovery may be an effective method to improve alactic power (the rate at which your body can produce energy using primarily anaerobic alactic energy systems). To be a little more specific, you can break down energy system work into 3 primary buckets:
Alactic: Maximum efforts <12 seconds
Lactic: Maximum and slightly sub-maximal efforts lasting 30-90 seconds
Aerobic: Submaximal efforts lasting longer than 2 minutes
It’s important to acknowledge that all of these systems are always working to some extent during all activity. The time references above are simply meant as a general guideline to help illustrate the dominant energy system. It’s also important to recognize that the amount of rest given after each effort will dictate the emphasized energy system. For example, 10s of all out work followed by 3 minutes of rest would emphasize alactic power. In contrast, 10s of all out work followed by 20s of rest, repeated for multiple reps would quickly transition south on the above list, eventually being a largely aerobic activity.
After reading Joel Jamieson’s book Ultimate MMA Conditioning a couple years ago, I just made an excel sheet with various training methods and their intended adaptations within specific energy systems. We do almost NO lactic work until the last 2-3 weeks of the off-season with our hockey players, as they spend their entire season exposed to significant amounts of lactate.
For most of players, their off-season energy systems work will follow a progression similar to one of these two broad scenarios:
1) Poor Fitness
Phase 1: Aerobic
Phase 2: Aerobic
Phase 3: Alactic Power/Aerobic
Phase 4: Alactic Capacity/Aerobic
2) Good Fitness
Phase 1: Aerobic
Phase 2: Alactic Power/Aerobic
Phase 3: Alactic Power/Alactic Capacity
Phase 4: Alactic Capacity/Lactic Capacity
We’ll spend more time in certain phases and return to methods from previous phases depending upon time, and the training emphasis for the given day.
With all of this in mind, and recognizing that certain methods (e.g. 5 minute Lactate Threshold Intervals) don’t really lend themselves well to working with multiple athletes at one time, which is the reality of most of these situations, there are a few specific methods that I would recommend on the skating treadmill.
Aerobic
Low Incline, Low Speed: 2 rounds of 8-12 reps of 30s on, 60s off
Low-Medium Incline, Medium Speed: 2 rounds of 8-12 reps of 10-15s @70-80% effort, with 60s rest
Low-Medium Incline, Medium Speed: 6-8 reps of 90s on, 90s off*
Alactic Power
Low Incline, Max Speed: 2 rounds of 6-10 reps of 6-10s on w/ complete recovery (e.g. 1-2 minutes)
Moderate Incline, Near Max Speed: 2 rounds of 6-10 reps of 6-10s on w/ complete recovery (e.g. 1-2 minutes)
Alactic Capacity
Low Incline, Max Speed: 2 rounds of 8-12 reps of 8-15s on, going every 60s
Moderate Incline, Near Max Speed: 2 rounds of 8-12 reps of 8-15s on, going every 60s
*This is absolutely brutal and not suitable by most athletes.
In a perfect world, the athletes would all have heart rate monitors on so you could monitor their recovery to ensure they aren’t surpassing their anaerobic threshold (AnT) in the lower level aerobic work (Options 1&2), that they’re building up to a Max HR during the 3rd aerobic option, and that they’re recovering fully during the alactic power work (typically an HR < ~130 beats per minute). This is reallyt he only way to be sure that the athletes are in fact training the energy systems you’re targeting. That said, I realize this isn’t possible for everyone and using the time intervals above will provide a pretty good guideline for most players. If the goal is to maximize recovery, err on the side of giving them more rest.
You can parlay these methods into different specific training goals. For example, alactic power work with shorter intervals can be thought of as maximum acceleration work. Longer alactic power intervals can be thought of as speed endurance. Having a larger incline will necessitate a faster stride rate, whereas flatter inclines will allow for longer stride lengths. With this in mind, higher inclines may be more appropriate for training the body position and stride pattern associated with initial accelerations from a standstill, whereas lower inclines may be better for training the body position and stride pattern associated with top-end speed. In addition to being great methods for developing the aerobic system, the first two aerobic methods are outstanding options for placing a large emphasis on teaching and refining skating technique.
Selecting which methods you use will depend on the training goals of the athlete and the amount of time you have available to help them reach their goals. You can use the phase-based progressions presented above as a guideline, but I’d also encourage you to use the long-term athletic development recommendations espoused by USA Hockey. I’d also remind you to err on the side of striving for more optimal technique over hammering higher speed work.
Hopefully this provides a framework from which you can design appropriate skating treadmill programs specific to the needs of the players you work with. If you have any questions, feel free to post them below!
Please enter your first name and email below to sign up for my FREE Athletic Development and Hockey Training Newsletter!
Get Ultimate Hockey Training Now!
“…an extremely rare comprehensive look at the present state of ice hockey training.”
“…a must-have for coaches and strength professionals at all levels of hockey.”


 Use CODE: "Neeld15" to save 15%