As a quick note, the extended Extended Holiday Sale for my Optimizing Movement DVDs ends this Saturday (12/14). If you’re interested in grabbing a copy, you can save 20% until Saturday here: Optimizing Movement
In this “Throwback Thursday” segment, I wanted to bring back a few exercises that I think can be extremely effective in challenging core stabilization patterns in athletes as well as a lot of fun. The exercises are what I describe (all the way back in 2008!) as reactive core training exercises. We continue to apply this concept in a variety of ways in our current programs, including with partner perturbations and active arm or leg movements both with and without external resistance. We’ve also used stability balls (or physioballs) in place of medicine balls and have used tall kneeling and half-kneeling positions for the belly press (e.g. Pallof Press) and overhead stabilization patterns shown below.
One more reason why I like these posts (I combined 4 short posts below), is that it mentions the fact that a side plank, in additional to being a lateral core stabilization pattern, is also a great shoulder stabilization exercise. The key here is to not just “sit” in that shoulder, but to actively push yourself away from the ground. When you do this, the muscles around your scapula (shoulder blade) and shoulder engage to help support the position. Since this video was filmed, we’ve also transitioned to having all of our athletes go palm(s) down on front and side plank variations, and typically use a slower perturbation rate than what is displayed here. Enjoy the videos and feel free to post any questions/comments you have below!
Reactive Core Training
Core training receives more publicity than any other aspect of training. The fact is, even people with a great understanding of how to train the core for its true functions, stability and force transfer, still miss out on one thing. In many instances, the core functions reactively. In other words, some movement (sensory input) causes the core muscles to fire (motor output) to produce stability. While I love planking, those exercises are limited in their ability to train the core to be reactive.
Adding a partner perturbation turns this basic core stabilization exercise into a reactive core (and shoulder!) stabilization exercise. It also ties in a team dynamic, as your athletes learn to work in pairs or small groups. The goal is the same as the regular side plank: maintain a neutral position. The only thing that’s changed is the sensory input.
Are you noticing a theme here? These are all the same exercises I’ve shown you before, but with a more advanced external sensory stimulus added. The greater the challenge to stability, the more carryover to athletics. I love these exercises for a couple reasons, but mostly because they are so simple to progress.
Start with the Pallof Press Hold (holding in the extended position).
Progress to Pallof Press for reps (extend your arms, then bring them back to your chest, then extend, etc.)
Progress to Pallof Press Hold with perturbation
Progress to Pallof Press with perturbation
Another one of my favorite reactive core training exercises is the overhead medicine ball perturbation. Same concept as previous exercises: maintain a stiff, stable core in the presence of an external force or perturbation. Holding the med ball overhead maximizes instability as it raises your center of mass (higher COM=greater instability). Check it out:
To maximize the functional carryover, you can combine a couple different core med ball exercises. For instance, you could pair an overhead floor throw with the overhead med ball perturbation. Check out the overhead med ball floor throw:
It would work like this. You would explosively slam the ball into the ground 3 times. After the third time, you’d freeze in the start position, with your arms extended overhead, squeezing the ball hard with both hands. At this point, a partner would provide small perturbations to the ball, and you would try to prevent all movement. This would continue for 5-10 seconds, then you’d perform 3 more slams, 5-10 more seconds of perturbations, 3 more slams, and 5-10 seconds of perturbations. That would be the end of one set.
See how it works? You just combine an explosive upper body/core power exercise with a reactive core stabilization exercise. Now you’re alternating being explosive and stable.
Over the last couple of weeks I shared a 3-part series on optimizing movement that dove into the importance of recognizing individual structural differences, what you need to know about “corrective” exercise, and how to individualize exercise in a group or team setting. If you missed those posts, I’d encourage you to check them out at the links below:
Earlier today, Patrick Beith published a guest post on his “Athletes Acceleration” site that discusses the system we use in assessing our athletes and making decisions on where to start from a movement improvement/correction perspective. The article also sheds light on why having symmetrical range of motion may not be desirable and why not every mobility restriction can be corrected. Check it out at the link below!
After Pat told me he was going to post the article this week, I decided to extend the holiday sale of my new DVD set Optimizing Movement through this Saturday (12/14). If you’ve been dragging your feet, you have another week to grab a copy and save 20%!
Get Optimizing Movement Now!
“…one of the best DVDs I’ve ever watched”
“A must for anyone interested in coaching and performance!”
Please enter your first name and email below to sign up for my FREE Athletic Development and Hockey Training Newsletter!
Optimal Movement: Individualizing Exercise in a Group Setting
If you missed the first two parts of this “Optimal Movement Series”, I’d encourage you to check them out at the links below, as they really lay the platform for today’s discussion.
One of the big questions that comes up in discussing integrating assessments and corrective work into training programs (and it’s a good one) is simply, “How do I do this in a group setting?” The reality is that for some of you, this will be much more easily accomplished than for others depending on the number of athletes and the amount of resources (e.g. time, space, equipment, help, etc.) you have. While the implementation will change depending on the setting, the thought process should remain almost exactly the same.
1) Identify the Assessments
The goal here is to decide, based on the logistical concerns identified above, which assessments you want to use. In making these decisions, consider:
Which assessments do I (and the supporting staff) feel comfortable performing? Invalid data isn’t worth collecting unless you recognize it’s just more practice for you to get better at the assessment.
Which assessments provide me the most usable information that will govern my programming and/or my approach to training an athlete? If there is no use for the collected information, it’s probably not worth collecting.
Related to above, which assessments have correctives that I can successfully implement based on logistics? This is a big one, as it comes back to the idea of “if you can’t successfully teach it, don’t program it.”
2) Divide the Group into Buckets
The goal here is to provide everyone with the correctives that will best address their primary or most prominent restriction or dysfunction, while also keeping the implementation realistic. Naturally, if you have 20 athletes and you have 3 different corrective exercises for each of them that are all completely unique, the program will fail because it’s simply not feasible to teach 60 exercises at one time. Most assessment systems will have a priority order in terms of what to address first. For example, the FMS hierarchy is to address limitations in mobility tests, then stability tests, then integrated movement tests. Similarly, PRI would suggest addressing those with a dominant “Posterior Exterior Chain” (limitations of hip adduction on both sides) before addressing a “Left Anterior Interior Chain) (limitations of hip adduction on the left only). You can use these algorithms as a starting point to simplify the implementation of the corrective process.
For example, with the junior hockey team I’m training this year, we performed the Shoulder Mobility, Active Straight Leg Raise, and Ankle Mobility (an assessment I learned at an FMS course, but not technically part of the FMS “7”) assessments from the FMS, and the Extension Drop, Adduction Drop, and Passive Abduction Lift tests from PRI (among many others). Using this information, I was able to put the players into PRI and FMS buckets:
PRI: PEC, Patho Left AIC (L anterior hip capsule laxity), Left AIC
FMS: Shoulder Mobility, Active Straight Leg Raise, Ankle Mobility
Then based on these buckets, I put together 1-3 correctives based on each pattern/limitation/dysfunction, and posted them all on a sheet on the wall. Because a lot of the PRI exercise concepts were new to the guys, I chose exercises for the patterns that were fairly similar, but with a few different tweaks, so when the kids came in, I could teach a few different exercises at once and simply and quickly explain how to tweak it based on the specific exercise the player had. Most players had 2-3 PRI-based exercises, and then if they also fell into any of the FMS buckets, they would have one corrective for that, so at most someone would have 6, which didn’t happen in the first phase (Some players had 5, most had 3 or 4). Importantly, because of the overlap in the PRI exercises between the different buckets, I only had to teach ~8 different exercises, which was very manageable.
Teaching all of these on Day 1 to a team that was largely unfamiliar with the idea of assessments and corrective work, let alone exercise driven by breathing sequences, was a lot of work. Day 2 was still a lot of work, but less as the players began to internalize the positions, movements, breathing sequences, and what they should be feeling. A couple months into the season, it’s been fun as some of the players will simply ask others how to do things and those players will teach/explain it to their teammate…correctly.
Corrective Exercise without Corrective Exercise
Mathematically, you can make something more positive by adding more positives or by subtracting negatives. Similarly, you can improve movement quality by adding positives or by removing negatives. In this context, positives might refer to corrective exercises to restore neutrality, mobility, and appropriate strength/control, and/or cuing in the form of physical touch, verbal instructions, or using implements like bands or balloons to drive the pattern you want. Negatives may simply refer to removing or changing exercises that don’t suit the individual athlete’s structure/function. For example, consider a posterior chain exercise for these populations:
5’8” athlete with optimal mobility: Trap Bar Deadlift with low grip from floor
6’4” athlete with optimal mobility OR 5’8” athlete with limited hip flexion: Trap Bar Deadlift with high grip from floor
6’4” athlete with limited hip flexion: Trap Bar Deadlift with high grip from blocks
Using this example, telling the 6’4” athlete with limited hip flexion to pull from the floor because that’s “full range of motion” would be misguided, and ultimately lead to excessive wear and tear on the athlete’s hip, lumbar spine, and any number of other places up and down the chain.
This is an oversimplified illustration of this concept, but the idea is to keep the pattern the same, but change the execution of the exercise based on the individual’s structure and functional competence. Simply changing the execution of exercises based on what depths/positions best cater to that individual’s structure can have a profound impact on that athlete’s ability to develop the physical capacities intended from the program while minimizing the risk of injury, which is always the goal.
Be an astute observer of movement and don’t make assumptions about what range of motion an individual should or shouldn’t have, and don’t hesitate to alter the performance of an exercise based on what allows the individual to perform the movement with the most optimal alignment and stability. Following these steps will make EVERY exercise more corrective…or at least less destructive, and allows you to improve (read: individualize) the execution of every exercise in group settings.
Get Optimizing Movement Now!
“…one of the best DVDs I’ve ever watched”
“A must for anyone interested in coaching and performance!”
Please enter your first name and email below to sign up for my FREE Athletic Development and Hockey Training Newsletter!
Optimal Movement: The Truth About Corrective Exercise
Part 1 of the “Optimal Movement Series” discussed several reasons why it’s so important to have an assessment process in place and identified a few ways in which structural changes will influence movement. If you missed that, you can check it out here: Structural Adaptations: Not Just a Hockey Problem
Today we’ll continue the discussion by delving into the topic of corrective exercise, what it means and when it’s appropriate to use.
The Truth About Corrective Exercise
I first started hearing the term “corrective exercise” about 7 years ago. Typically, it’s used within the context of basic mobility exercises or lower level stability exercises thought to help restore balance in mobility and stability across joints and improve “awareness” to ultimately improve movement quality. The general rationale here was to take exercises used in the rehabilitation of certain injuries, and integrate them into training programs in a pre-emptive effort to help minimize the risk of these injuries ever occurring. This made sense to me then, and still makes sense to me now, to an extent.
One thing that has become more clear to me as I’ve had opportunities to attend FMS, PRI, and DNS courses, among others, is that in order for something to be truly “corrective”, there needs to be some sort of test or “audit”. In other words, if you’re telling someone to do an exercise to “correct” something, how do you know if it’s working? Thinking in this way has really changed the way I think about the entire training process (as I’ll discuss more in a future piece).
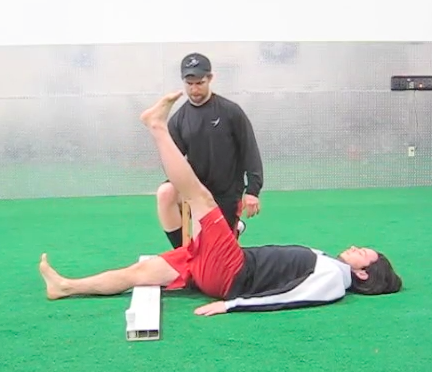
As an example, if you’re familiar with the FMS Active Straight Leg Raise test, you know that the test is scored as a 3, 2, or 1 depending on how high the individual can raise his/her leg while maintaining the specified alignment or a “0” if the individual has pain. These zones are separated by measuring the distance between the ASIS of the hip and the mid-patella, and then marking half of that distance (roughly the mid thigh). Anything above the midpoint is a “3”, anything between the midpoint and the mid-patella is a “2”, and anything below the mid-patella is a “1”. If it’s painful, it’s a “0”. As a general rule, the desired goal here is to get “2’s” on both sides.
Active Straight Leg Raise
If, for example, someone had a “1’s” on both sides, and you integrated a Supported Single-Leg Lowering exercise into their program as a means of helping them achieve 2’s on both sides, this could appropriately be called a “corrective exercise”. You have a test, and you’re programming a specific exercise to improve a quality that you can then assess the effectiveness of by retesting.
Band-Supported Single-Leg Lowering
As another example, I’ve seen a good number of people that have a limited Adduction Drop Test (see video below) on the left, that also have less Active Straight Leg Raise motion on the left compared to the right. This is likely because of the position of their pelvis, which is oriented to the right and forwardly tipped on the left, placing the left hamstring complex under tension.
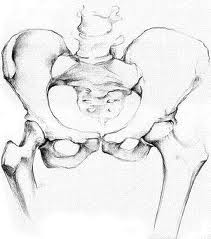
A picture taken from PRI illustrating the pelvic position most humans gravitate towards
In this situation, a Left Adductor Pullback may be sufficient to reorient the pelvis to a more neutral position, which would then clear the Adduction Drop Test AND the discrepancy in Active Straight Leg Raise.
These examples highlight two situations where exercises are being used to correct a pattern. Importantly, the goal here is to now integrate the newly acquired function (be it mobility, stability or both in nature) into more “functional” or capacity-based exercise. For example, once we’ve established a reasonable amount of symmetry within an Active Straight Leg Raise pattern, we have a green light to progress to double- and single-leg loaded hip hinge variations (e.g. trap bar deadlifts, 1-leg stiff-legged deadlifts, etc.), and if appropriate for the individual’s training goals, more explosive movements within this pattern, such as broad jumps, kettlebell swings, hang cleans, etc. These are just a few examples; obviously there are other factors that need to be accounted for in exercise selection, but the idea is to progress beyond corrective work.
This idea of Assess -> Correct -> Reasses has a different end-goal, in most cases, than integrating exercises like glute bridges, miniband walks, front planks, etc. into programs. The latter can be considered more “activation” in nature, or really simply fall into the broader bucket of what I think of as core training. If you call any miniband walk a corrective exercise, the follow up question should be “corrective for what?” There may be an answer for that, depending on the athlete. Athletes that are well trained and have established a quality squat, deadlift, and single-leg patterns may do mini-band walks with the intent of activating the lateral hip musculature almost within the same context as a warm-up. In contrast, an athlete whose knees touch while squatting may benefit from the neuromuscular cuing that the band provides to engage the glutes and lateral hip musculature to maintain better alignment during the movement. One is warm-up; one is corrective.
The reality is that in most cases the goal is to do as little true “corrective” work as possible, and quickly progress to training that will enhance physical capacities (e.g. speed, power, strength, conditioning, etc.). In many instances, depending on the dysfunction, I think it should be a quick journey to individual-specific full training clearance. The waters get a little muddier when programming is attempting to counteract positions the athlete/client spends time in outside of the training facility.
It’s for this reason that I don’t think it’s a bad idea to continue incorporating exercises designed to be corrective on an ongoing basis. For example, having a guy that sits hunched over in front of a computer all day do a couple sets of glute bridges and thoracic spine rotations is unlikely to hurt, and very likely to help. If they continue to pass your reassessment, the exercises can be viewed as reinforcement, warm-up, activation, neuromuscular cuing, etc. If they aren’t passing the reassessment, then you have to consider (among other things):
Does the corrective exercise actually work for THAT individual?
Do you need to discuss alternative strategies for the positions/postures that individual spends the majority of their time in away from you?
Do you accept that you may never “win” the corrective battle for a given individual, but continue to program specific corrective work in an attempt to “minimize the bad, and maximize the good”?
In the last year, I’ve heard a few people “in the industry” with whom I have a lot of respect dismiss the term “corrective exercise”, and I completely get it. Corrective exercise is being thrown around a lot, often to simply refer to low-level activation exercises, which may not be correcting anything. There are two major problems with this:
If there is too large of a disconnect between corrective exercise and the individual’s functional activities, the correctives won’t stick.
Some people in training professions get so caught up in trying to correct everything that they forget their job is to improve physical capacities.
As an example of both, sometimes range of motion is restricted as a protective mechanism if the individual doesn’t possess the stability/control or strength to own that range. In these (and many other) circumstances, strength training with traditional exercises may be the most corrective thing the person can do.
The important take homes here are that corrective exercise needs to be programmed to correct something, and there should be a way to assess whether it’s working or not. Corrective work doesn’t always need to be in the form of low level activation exercises, and not every low level activation exercise needs to be programmed with a corrective intent. As with every exercise in your program, you should ask yourself, “Why am I programming this exercise, and is it producing the intended results?”
In a couple days, I’ll be back with the third part of this series, “Individualizing Corrective Exercise and Movement in a Group Setting”. In the meantime, don’t forget to check out the Optimizing Movement DVD set, which you can get for a $20 discount until next Saturday (December 7th), as part of a special “Extended Black Friday Sale”. Click the link below for more information!
Get Optimizing Movement Now!
“…one of the best DVDs I’ve ever watched”
“A must for anyone interested in coaching and performance!”
Please enter your first name and email below to sign up for my FREE Athletic Development and Hockey Training Newsletter!
Optimal Movement: Structural Adaptations Are Not Just A Hockey Problem
If you’re reading this from the U.S., I hope you and your family enjoyed a Happy Thanksgiving yesterday! I’m still fighting off a pie coma, but was able to get some writing done earlier in the week so the day wouldn’t be a complete loss. Enjoy!
Over the last several years, I’ve written a lot about the importance of assessing athletes and integrating corrective work into their training programs. More recently, I’ve discussed some of the principles of PRI, especially as they pertain to predictable asymmetries in the hips of hockey players. If you only read what I’ve written about these topics, it’s likely you have a very skewed understanding of what actually goes on at our facility.
Today’s article will be the first in a series that dives deeper into my training philosophy, and more importantly, the systems we’ve put in place to ensure our athletes are making progress on the full spectrum of athleticism.
Structural Adaptations: Not Just a Hockey Problem
Several months ago, I wrote an article highlighting the results of several research studies published in the last few years (See: Groundbreaking Research on Hockey Hip Injuries. More specifically:
A 2011 study from Silvis et al. found that 77% of the 39 NCAA D1 and pro hockey players had abnormal hip/groin MRI findings that were indicative of pathology, despite being entirely asymptomatic.
A 2012 study from Birmingham et al. linked FAI (a bony overgrowth at femoral head/neck and/or acetabular hood) to increased motion at the pubic-symphysis, a precursor to osteitis pubis and potentially sports hernias.
A 2013 study from Philippon et al. demonstrated that by the time youth hockey players reach the Midget age level (16-19 y/o), 93% of players have overgrowths consistent with FAI and 93% have labral tears.
A 2013 study from Jakoi et al. found that NHL players were less productive in the 2 years following sports hernia surgery than they were prior to the surgery.
Because of the title, you may have glossed over another important statistic:
A 2013 study from Larson et al. found that 90% of the 125 NFL prospects currently competing at the college level they looked at and 87% of the hips had findings consistent with FAI. Of these players, those with symptoms tended to have a greater prevalence of CAM or Mixed FAI and osteitis pubis, but the only independent predictor of groin pain was how much bony overgrowth their was.
Other evidence from Hack et al. (2010) suggests that roughly 1 out of every 4 asymptomatic men in the general population will also have some degree of FAI. Switching joints, a now nearly 20 year old study from Jensen et. al (1994), found that 64% of the 98 asymptomatic people that underwent an MRI of their lumbar region had abnormal findings. A 2002 study from Miniaci et al. found that 79% of the 28 asymptomatic shoulders of pro baseball pitchers had labral abnormalities.
Anecdotally, hockey players are more likely to possess a structural change known as hip retroversion, which essentially allows them more hip external rotation and less hip internal rotation. This is likely an adaptation resulting from skating a lot during the developmental years. Similarly, baseball pitchers (and all athletes that throw at a fairly high volume during adolescence) are likely to have some degree of humeral retroversion, a posterior torsion of the humerus that allows for more external rotation at the joint.
This is a demonstration of femoral anteversion, but is still useful in illustrating how the angle at which a bone inserts at one joint (look at the femoral head angles here) can have a profound influence on the position of an adjacent joint (these knees are pointed straight ahead).
These studies are truly just the tip of the iceberg, as there is a larger body of evidence suggesting that the overwhelming majority of people in general, and especially athletes, have various forms of structural adaptations and sub-threshold pathologies. Importantly, not all of these individual will present with pain. In fact, the overwhelming majority will not. As Lorimer Moseley discusses in the video below, pain be tricky, as it is often context- and emotion-dependent. Furthermore, pain site and pain source are not always synonymous, as the irritated area may be doing everything right, but compensating for some other structural or functional limitation/dysfunction.
That said, structural adaptations will absolutely affect the individual’s movement. For example, an individual with FAI will have limited hip flexion range of motion, which will in turn limit squat depth, lunge depth, and step-up box height. If this limitation is ignored, the femoral head hits end range within the joint, which increases the stress to the hip labrum, but will also then cause compensatory movement, such as lateral flexion or rotation of the pelvis, or excessive flexion of the lumbar spine. If someone asked me how to tear a hip labrum and develop lumbar disc pathology simultaneously (I don’t get this question often), I would recommend they back squat past hip end-range repeatedly. In this scenario, you have compression from the ground up and the bar down going through a lumbopelvic complex that is undergoing multiplanar torsion, with at least one hip stuck at end range and grinding around that point.
As another example, consider a baseball player that presents with the same total rotation in both shoulders, but 20° more external rotation in his throwing arm. Can you imagine how doing exercises like a barbell snatch would drive rotation and other compensatory adjustments throughout the rest of the body as the throwing arm has significantly more motion overhead.
These are just a couple examples, to which there are many. The important thing is to recognize that athletes/clients present with unique structures and unique sets of postural and movement biases that will influence the execution of their training programs. Some of these things can be “corrected” or trained to a more optimal state, while others will simply just need to be accounted for in the individual’s exercise selection. Naturally, in order to recognize any of these things, it’s necessary to have a system of assessment/screening and a corrective approach.
In a couple days, I’ll be back with the second part of this series, “The Truth About Corrective Exercise”. If you’re interested in this topic, I’d encourage you to check out my 2-DVD set Optimizing Movement, which you can get for a $20 discount until next Saturday (December 7th), as part of a special “Extended Black Friday Sale”. Click the link below for more information!
Get Optimizing Movement Now!
“…one of the best DVDs I’ve ever watched”
“A must for anyone interested in coaching and performance!”
Please enter your first name and email below to sign up for my FREE Athletic Development and Hockey Training Newsletter!
References:
Silvis, et al. (2011). High Prevalence of pelvic and hip magnetic resonance imaging findings in asymptomatic collegiate and professional hockey players. American Journal of Sports Medicine, 39(4), 715-721.
Birmingham, et al. (2012). The effect of dynamic femoroacetabular impingement on pubic symphysis motion: a cadaveric study. American Journal of Sports Medicine, 40(5), 1113-1118.
Philippon, et al. (2013). Prevalence of increased alpha angles as a measure of cam-type femoroacetabular impingement in youth ice hockey players. American Journal of Sports Medicine, 41(6), 1357-1362.
Jakoi, et al. (2013). Sports hernia in National Hockey League players: does surgery affect performance? American Journal of Sports Medicine, 41(1), 107-110.
Larson, et al. (2013). Increasing alpha angle is predictive of athletic-related “hip” and “groin” pain in collegiate national football league prospects. Arthroscopy, 29(3), 405-410.
Hack, et al. (2010). Prevalence of cam-type femoracetabular impingement morphology in asymptomatic volunteers. The Journal of Bone and Joint Surgery, 92(14), 2436-2444.
Jensen, et al. (1994). Magnetic resonance imaging of the lumbar spine in people without back pain. New England Journal of Medicine, 331(2), 69-73.
Miniaci, et al. (2002). Magnetic resonance imaging of the shoulder in asymptomatic professional baseball pitchers. American Journal of Sports Medicine, 31(1), 66-73.


 Use CODE: "Neeld15" to save 15%