Last week I shared an integrated mobility exercise that opens up some range of motion along an anterior sling connecting the front of one hip with the opposite shoulder.

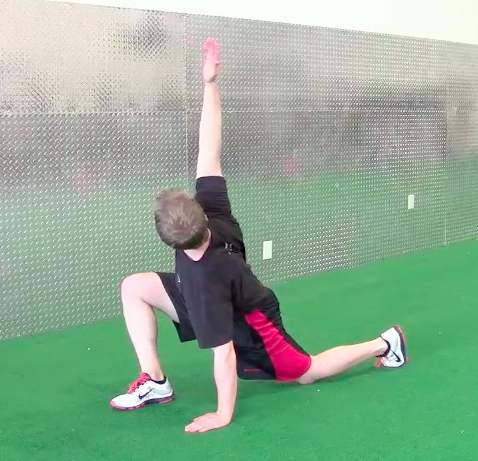
This variation addresses the same concept on the opposite side of the body, now focusing on the connection between the glute and the opposite lat.

This video is of a “Diagonal Hip Rock w/ Opposite Reach”

A few notes:

✅ Set up on hands and knees and either reach one leg back on ~45° angle or bring one leg up into a “pigeon” position to feel a big stretch in the back of that hip

✅ Sink into the stretch while keeping your hips square to the floor (e.g. don’t open up as in a seated 90-90 position). Holding this position, reach with the opposite arm across your body, side bending through your torso to feel a stretch through the lat.

✅ Each rep, attempt to reach slightly further with your hand, and every few reps try to sink slightly deeper into your hip.

Typically performed for 6-10 reps per side.

Feel free to post any comments/questions below. If you found this helpful, please share/re-post it so others can benefit.

To your success,

Kevin Neeld
SpeedTrainingforHockey.com
HockeyTransformation.com
OptimizingAdaptation.com

P.S. For more information on how to assess movement and integrate specific strategies to improve mobility and movement quality in training, check out Optimizing Movement. Don’t have a DVD player? Send me a note through the contact page after you checkout here Optimizing Movement and I’ll get you a digital copy of the videos!

Enter your first name and email below to sign up for my FREE Sports Performance and Hockey Training Newsletter!

Many movements in sports rely on diagonal myofascial “slings” that create a connection between one hip and the opposite shoulder.

Influencing mobility at individual joints is extremely important, but including “integrated” mobility work along these diagonal slings can address limitations that may not appear at the single-joint level.

This video is of a “1/2 Kneel Hip Flexor w/ Opposite Pec Mob” that taps into emphasizes the fascial connection through the front of the down-side hip, the obliques, and opposite pec.

A few notes:

✅ Set up by pushing the down side knee into the ground, rolling the tailbone under and shifting the hip forward to feel a deep stretch through the hip flexors.

✅ Grab the pole with the bottom hand palm down and the top hand palm up. Use the bottom hand to push the top back at ~45° angle above horizontal until you feel a big stretch through your pec.

✅ Each rep, attempt to push slightly further back to increase length/tension across the entire pathway. You can “take up slack” by sinking the hips further forward, and/or adding rotation through the t-spine.

Typically performed for 6-10 reps per side OR for 3-6 reps of alternating periods of 10s of holding a stretch, and 10s of pushing against the stretch (1-2mins of total tension).

Feel free to post any comments/questions below. If you found this helpful, please share/re-post it so others can benefit.

To your success,

Kevin Neeld
SpeedTrainingforHockey.com
HockeyTransformation.com
OptimizingAdaptation.com

P.S. For more information on how to assess movement and integrate specific strategies to improve mobility and movement quality in training, check out Optimizing Movement. Don’t have a DVD player? Send me a note through the contact page after you checkout here Optimizing Movement and I’ll get you a digital copy of the videos!

Enter your first name and email below to sign up for my FREE Sports Performance and Hockey Training Newsletter!

One of my favorite things about the “Throwback Thursday” process is that I have an opportunity to re-read some of my older work. Aside from picking up some information that I may have forgotten about, it also allows me to reflect on where I was at in my education at the time of writing it, and what, if anything, has changed since.

Today’s post comes from 2011, when I was very early in my journey of digging into the Postural Restoration Institute’s information.

Nearly 4 years later, my assessment process has evolved significantly. Nonetheless, the pervasive predictable asymmetries discussed in this post continue to present themselves, and are one of the primary things I look at in designing training programs. I even reported some of the results of my “corrective” approach, particularly as it pertains to improving hip mobility in hockey players, in Ultimate Hockey Transformation.

Check out the post below and let me know if you have any questions in the comments section below!

The Myth of Symmetry

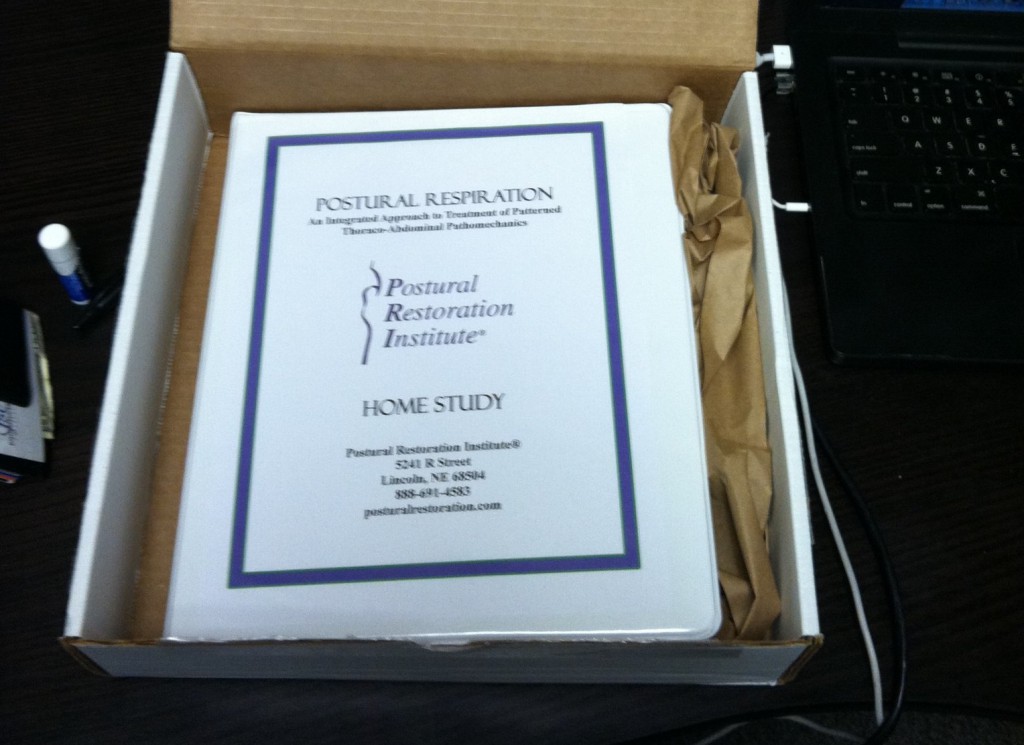
Over the last couple weeks, I’ve been doing a lot of hip assessments at Endeavor Sports Performance on our incoming hockey players before they start their off-season training programs. The results of these assessments have shed light on the significant variations in hip structure and range of motion within (side-to-side differences) and among (differences from one player to the other) hockey players. Last week, I also started to dive into the Postural Restoration Institute‘s Postural Respiration home study course.

Over/Under on number of weekends I can spend going through 16-hour PRI home study courses before I wake up and find my Facebook relationship status has changed to “single”: 2

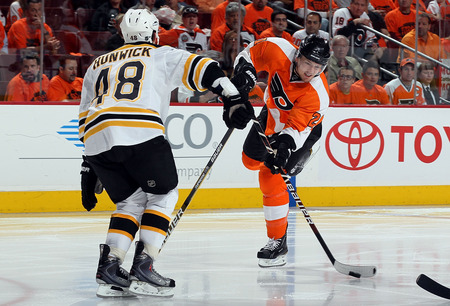
An underlying assumption of many hockey training programs is that players are entering the program in a state of symmetry. In recognition of the idea that side-to-side imbalances are one of the greatest injury risk factors, most training programs have the same number of sets and reps for each exercise on each side of the body or in each direction (depending on the exercise).  Somewhat in contrast, in the past I would have said with great confidence that an underlying goal of a training program is to restore symmetry across joints and between sides of the body using asymmetrical programming. An illustration of this thought process lies in the idea that players rotate thousands of times more in one direction to shoot the puck than they do the opposite direction. As a result, doing horizontal rotation or “anti-rotation” exercises emphasizing the opposite direction will help restore symmetry across the involved joints and muscle groups. Still, this presumes that, in the absence of hockey, the players would be symmetrical.

Thousands of high velocity unilateral rotations result in structural and neurological asymmetries

In reality, there are a number of structural and pattern-driven asymmetries that affect hockey players that warrant improved awareness. This includes, but is not limited to:

  1. The left thoracic cavity houses the heart and pericardium; the right is wide open
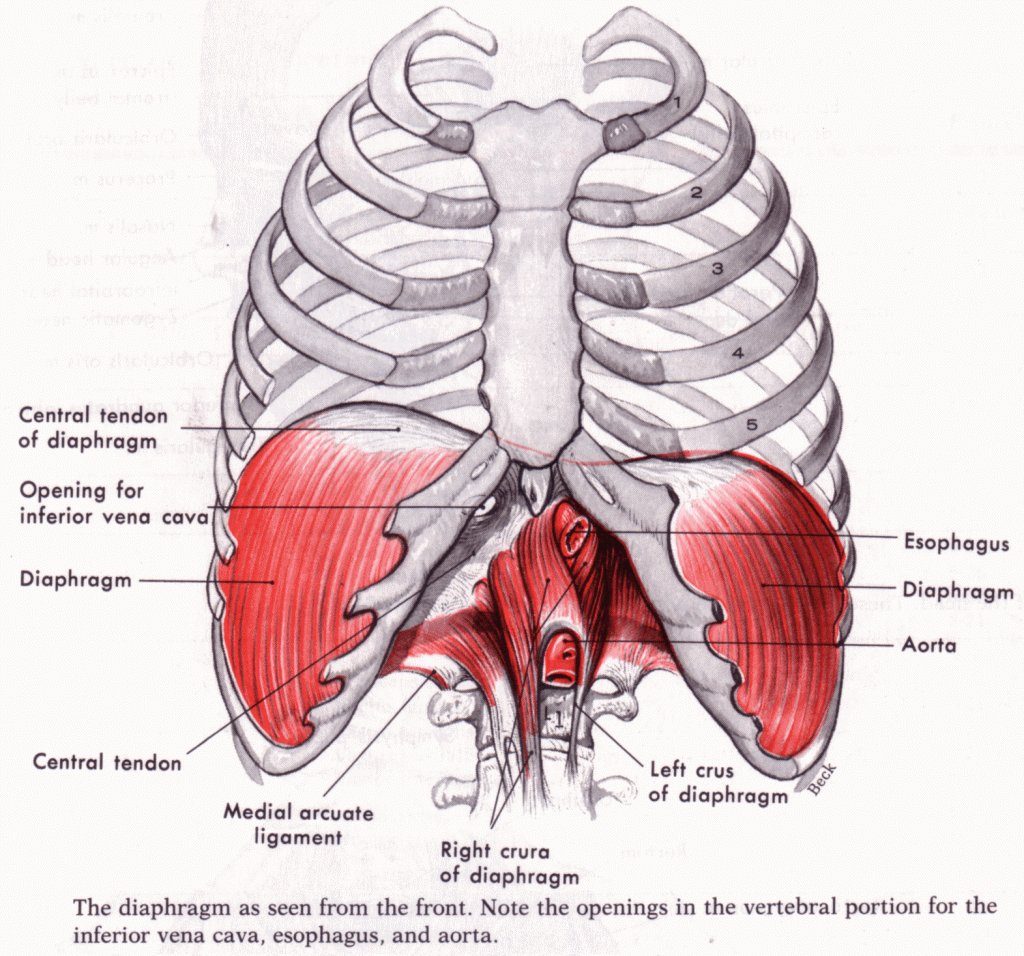
  2. The right diaphragm leaflet is 2/3 larger than the left
  3. The right lung has 3 lobes; the left lunge has 2
  4. There is a liver on the right that is not on the left
  5. The vagus nerve extends longer on the right than the left

Note the side to side differences between the left and right hemi-diaphragms

From a movement pattern standpoint, we’re a very right-side dominant society. We have a greater tendency to shift weight onto our right leg, reach with our right hand, etc. (You’re probably in a state of left external thoracic rotation using your right hand to control your computer mouse, tracking pad, ipad or cell phone right now!). This leads people to a state whereby they:

  1. Are in a position of right weight shift, which can result in an increase in right foot supination and left foot pronation
  2. Are in a position of relative left hip flexion, external rotation, and abduction, and right hip extension, internal rotation and adduction
  3. Are in a position of right pelvic orientation and left thoracic rotation
  4. Present with a lower right shoulder compared to the left
  5. Have a left rib flare and decreased left zone of apposition with a concomitant chronic state of insufficient exhalation

The combined effect of these structural and patterned asymmetries has profound performance implications. To be clear, the structural asymmetries are built into our system and are necessary for proper function. The goal is never to “eliminate” them (which would be impossible), but rather to ensure that they remain in as close to a state of NEUTRALITY as possible. In other words, we aren’t symmetrical, but we can be neutral. The major paradigm shift here is that neutral is in a relative state of asymmetry and that the goal of systematic asymmetrical programming is to restore neutrality to the player, not symmetry.

A more comprehensive understanding of these asymmetries provides incredible explanatory power for why hockey players have such a significant prevalence of injuries such as CAM impingement, adductor strains, sports hernias, and SI joint instabilities. It also explains why we see more CAM impingements and sports hernias on the right side, and hip adductor/flexor strains on the left side. Most importantly, it provides a framework from which assessments can be designed to identify these non-neutralities and exercise progressions can be implemented to bring the player to a more optimal alignment.

If you’re interested in learning more about the Postural Restoration Institute or how structural asymmetries influence performance, I highly recommend you check out the interview with PRI founder Ron Hruska that Joe Heiler did as part of the 2011 Sports Rehab to Sports Performance Teleseminar. Joe is selling all of the audios as a package for $29.99, but you could always just grab a membership to his site for $1 (14-day trial then $9.95/month after) and listen to them that way (it’ll save you a couple bucks). Either way, it’ll be well worth the investment. I’ve listened to the Hruska interview at least 5 times and there are a few others that have received similar playing time. Click the image below to check out SportsRehabExpert!

Check back in a couple days for an easy way to assess for a structural hip abnormality that a lot of hockey players have, but don’t know about!

To your success,

Kevin Neeld
HockeyTransformation.com
OptimizingMovement.com
UltimateHockeyTraining.com

Please enter your first name and email below to sign up for my FREE Athletic Development and Hockey Training Newsletter!

Get Ultimate Hockey Transformation Now!

Year-round age-specific hockey training programs complete with a comprehensive instructional video database!

Ultimate Hockey Transformation Pro Package-small

Get access to your game-changing program now >> Ultimate Hockey Transformation

“Kevin Neeld is one of the top 5-6 strength and conditioning coaches in the ice hockey world.”
– Mike Boyle, Head S&C Coach, US Women’s Olympic Team

“…if you want to be the best, Kevin is the one you have to train with”
– Brijesh Patel, Head S&C Coach, Quinnipiac University

This “Thursday Throwback” features an article I wrote over 4 years ago that overviews what may prevent someone from squatting deeply, and an assessment you can use to check your squat depth. Over the last several years, I’ve read a ton of research on hip anatomy and progressive structural changes. In the end, it seems that structural limitations are becoming more of the norm than the exception and it is incredibly important that coaches AND athletes/lifters recognize that what was previously considered a full squat may not apply to everyone/you. Symptoms of squatting past your range can manifest in many ways, but two of the more common ones are low back pain and anterior hip pain. I’ve also seen pretty significant discomfort in the piriformis, adductor complex, and TFL as a result of this pattern.

Check out the post below, as well as the article I link to, and please feel free to post any comments or questions you have below. This is an important topic that affects just about everyone that trains (or moves)!

The Truth About Deep Squatting

About a month ago, my article “Battling Anatomy: Implications for Effective Squatting“, was published at SBCoachesCollege.com, a website I couldn’t say enough good things about.

The other day I received an excellent question from Jason Price, Founder and CEO of Athletes Equation.

“Hello Kevin,
I read you article on SB Coaches College today and really found it informative and enjoyed it very much.  I did have a few questions after reading that I was hoping you could provide me with some further information or clarification.  What I have noticed with many of the youth athletes that I am training is that their hip mobility is terrible. I too have utilized the “touch and go” method to control how much depth they can attain until they have improved their mobility.  I have found this to be a fantastic method for most athletes.  But, I was thinking after reading your article about athletes which are dependent of being in the deep squat position in their sport.  I train several weightlifters and one of them still suffers from a very similar condition as the individual in your videos.  I am wondering what suggestions you would have for me in coaching this individual.  In the sport of weightlifting as I am sure you are aware you must get into the deep squat position to effectively clean and snatch significant weight.  My athlete does not have the significant discrepancy one side to the other.  But, he does have the tuck under at the bottom of the deep squat position.  So how can I effectively train him to receive the barbell deep in the squat with this technical flaw without placing him in this potentially hazardous position?  Should he not squat deep? Do you know of any methods outside of orthopedic evaluation for anatomical abnormalities?

Again, fantastic article i really enjoyed it and felt you gave many of the readers an alternative viewpoint as to why some of these technical breakdowns happen.  I appreciate your time and any response.”

My immediate thought is to first consider that everyone is not built for deep squatting.  Despite the increasing usage of pictures of babies in a deep squat position as evidence for this ability, the hip joint and associated ligaments change as a natural/circumstantial part of development, that may result in a range of motion (ROM) limitation in some people.  Having said that, it’s always better to assess than guess.

With regards to the lifter in the article video, the side-to-side discrepancy simply indicates that only one of his hips, the right one, lacks full ROM.  In his case, I was able to recommend he see a hip specialist because he had multiple signs of CAM impingement.  Notably, he lacked internal rotation ROM on the right side compared to the left and flexion/adduction on the right side was extremely painful.

Getting more to your question about the bilateral hip tuck, the first thing you could try is to coach him to push his knees out while he’s going down and to keep his knees out while driving up.  This opens up the hips to allow for maximal hip flexion while avoiding bony contact between the trochanters of the femur and the “spines” of the hip bone.  Mark Rippetoe wrote a great article called “You Don’t Know Squat without an “Active Hip”” about this topic.

If that doesn’t clear things up, there is a pretty straight forward assessment you can use to see whether this is a soft tissue restriction or a joint anatomy restriction.  A few months ago I had the pleasure of talking to Shirley Sahrmann about this issue.  She recommended using quadruped rocking to assess their ROM.

Quadruped rocking involves putting the lifter in a quadruped position, with their knees under their hips, top of their feet flat against the floor, and hands under their shoulders.  The lifter should set up in a neutral lumbar spine position, then use their arms to push their hips back (pushing into hip flexion) so as to sit on their heels, while MAINTAINING the neutral lumbar position.  Note the angle that the hips begin to tuck.  Stop them there, have them return to the starting position and try again.  Dr. Sahrmann basically said that 8-10 repetitions of this should improve their hip ROM.  If it doesn’t, their hip joint anatomy doesn’t allow  for it and never will.  Any attempt to push beyond this point will lead to lumbar flexion, and invariably some sort of back pain.

I’ve found this assessment to be incredibly useful.  In less than 30 seconds I’m able to see what kind of hip flexion ROM someone has.  If their hips start to tuck at 90 degrees every time, and it doesn’t improve with more repetitions, I know that’s the extent of their ROM and stop them at that point during all exercises (squats, lunges, etc.).  Depending on the severity of the restriction, this may also mean that they can’t perform a deadlift off the floor, in which case I’d move them to a rack pull from a height slightly above their end range.

Ask your athlete where they feel the restriction while quadruped rocking.  If they feel like they’re tight on the back side, some mobility work may clear that up, but it’s also likely that quadruped rocking will clear that up.  If they feel restricted in the front or any type of grinding in or around their “groin” area, it’s likely a hip joint limitation.  I don’t recommend forcing lifters through positions their hip joints don’t allow for.  That is, unless they’re looking for low back pain and a hip labral tear.  Hope this helps.

To your success,

Kevin Neeld
OptimizingMovement.com
UltimateHockeyTraining.com

Please enter your first name and email below to sign up for my FREE Athletic Development and Hockey Training Newsletter!

Get Ultimate Hockey Training Now!

“…an extremely rare comprehensive look at the present state of ice hockey training.”
“…a must-have for coaches and strength professionals at all levels of hockey.”
Ultimate Hockey Training

As athletes get deeper into their seasons, being diligent about recovery becomes increasingly important. In general, athletes tend to focus on positive habits when it’s too late. For example, some may wait until they’re already sick before they start getting enough sleep every night and drinking water, or wait until they’ve strained a muscle before they start doing their mobility and corrective work. While it’s never bad to adopt good habits (late is always better than never), the reality is that a little everyday is better than a lot all at once. Over the last week I’ve added a couple articles that discuss different recovery considerations and strategies. If you missed those, you can check them out at the links below:

  1. 3 Powerful Recovery Strategies for Athletes
  2. Overtraining and Recovery

While this has a little less to do with recovery and overtraining, I also thought I’d remind you about the recipe I posted the other week. Give it a shot: Seasonal Post-Workout Snack

Hip and Thoracic Mobility
Over the last several years, I’ve talked a lot about the importance of maintaining, and in most cases improving, hip and thoracic mobility in all athletes, but especially hockey players. I have a lot of different mobility exercises that we use for these purposes. Having a variety is helpful both in terms of addressing slightly different planes of movement and in keeping the players interest. For the players that buy in and do some of this work almost every day of the week, doing the same exercises over and over can get pretty stale.

For the Flyers Junior Team I’m working with, we’re basically rotating 5 mobility drills every 4 weeks, which we perform after rolling, but before the dynamic warm-up. This week we started a new series that included one of my favorite integrated hip and thoracic mobilizations, a “Static Spiderman Lunge w/ Rotation”.

Static Spiderman Lunge w/ Rotation

[quicktime]http://www.kevinneeld.com/wp-content/uploads/2013/10/Static-Spiderman-Lunge-With-Rotation.mp4[/quicktime]
We’ve been using a slightly more static variation of the above by not having the players return to the standing position between rotations. In other words, their feet don’t move, only their upper body.

A few coaching points to keep in mind:

  1. You have to step forward far enough to get full hip extension on the back side while keeping the front foot flat.
  2. If you’re having trouble getting full hip extension, squeeze your butt on your back leg.
  3. Actively pull your front knee out.
  4. Reach straight up toward the ceiling, not back.
  5. Think of getting “long” through your arms by actively pushing into the ground with the bottom arm and actively reaching up with the top arm.
  6. Look through your hand.

Static Spiderman Lunge with Rotation

Rotating the neck to “look through the hand” helps to unlock more thoracic rotation.

If performed correctly, you’ll probably feel a stretch to your posterior adductor magnus on the front side (think back side of the high groin), the hip flexor on the back side, and your chest/shoulder on the top arm. That said, everyone is built differently and will experience this position differently. From a coaching perspective, I tend to just look for optimal alignment and if the athlete has that, they’ll “feel it” wherever they’re supposed to. Athletes with limited hip flexion or thoracic rotation will really struggle with and benefit from this. If there is a structural limitation to hip flexion (e.g. FAI), then you can put a 12-18″ box or bench under the athletes hand which will help keep them up a little higher.

This is a great exercise to address hip and thoracic mobility together. Give it a try and post your comments below! If you want to get access to over 800 other exercise videos, including over 70 mobility/warm-up exercises, check out the Ultimate Hockey Training Insider’s Section today!

To your success,

Kevin Neeld
OptimizingMovement.com
UltimateHockeyTraining.com

P.S. The first step toward driving physical adaptation is making sure you’re following a quality training program. If you don’t have a written training program that tells you EXACTLY what to do, then check out Ultimate Hockey Training‘s Insider Section!

Please enter your first name and email below to sign up for my FREE Athletic Development and Hockey Training Newsletter!

Use CODE: "Neeld15" to save 15%